

Table of Contents
- The Copy-Paste Database Problem
- What is Model Context Protocol (MCP)?
- What is FastMCP?
- Installation and Database Setup
- Database Setup: Sample E-commerce Data
- Building Your First Database Tools
- Schema Discovery with Resources
- Connect to MCP Clients
- Connect with MCP Clients
- Test the Server
- Conclusion
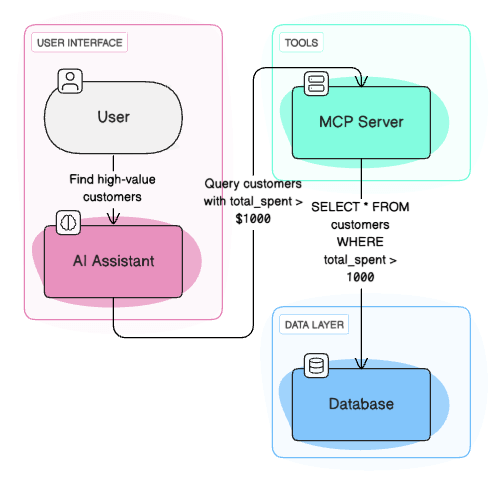
The Copy-Paste Database Problem
AI has revolutionized how we write code, making complex database queries accessible to anyone who can describe what they need. But the workflow becomes frustrating when you’re trapped in this repetitive cycle: ask your AI for SQL, copy the query, paste it into your database tool, run it, copy the results, and paste them back to your AI for analysis.
Here’s what this workflow looks like in practice:
# 1. Ask AI for SQL
"Can you write a query to find high-value customers?"

# 2. Copy AI's response
SELECT customer_id, total_spent FROM customers WHERE total_spent > 1000

# 3. Paste into database tool, run query, copy results
# 4. Paste results back to AI for analysis
This manual approach creates several challenges:
- Switching between AI and database tools breaks your analytical flow
- Copying and pasting introduces transcription errors
- AI can’t explore data independently or learn from previous queries
What if your AI could connect directly to your database, run queries autonomously, and provide insights without you ever copying and pasting SQL? That’s exactly what you’ll build in this article using MCP.
Stay Current with CodeCut
Actionable Python tips, curated for busy data pros. Skim in under 2 minutes, three times a week.
Key Takeaways
Here’s what you’ll learn:
- Eliminate copy-paste SQL workflows by building direct database access for AI agents
- Create FastMCP servers with database tools using just decorators and 10 lines of code
- Implement read-only query execution with automatic safety validation and transaction handling
- Build schema discovery resources that provide table structures without query overhead
- Connect to multiple MCP clients including Claude Code, Claude Desktop, and Cursor for autonomous data analysis
What is Model Context Protocol (MCP)?
Model Context Protocol (MCP) is a standard that allows AI models to connect directly to external systems like databases, APIs, and file systems. Instead of being limited to generating code or text, MCP enables AI models to take actions and access real data.
Think of MCP as a bridge between your AI assistant and your database. When you ask AI to “find high-value customers,” the assistant discovers your database tools, calls the appropriate functions, and provides actionable insights, all without you leaving the conversation.
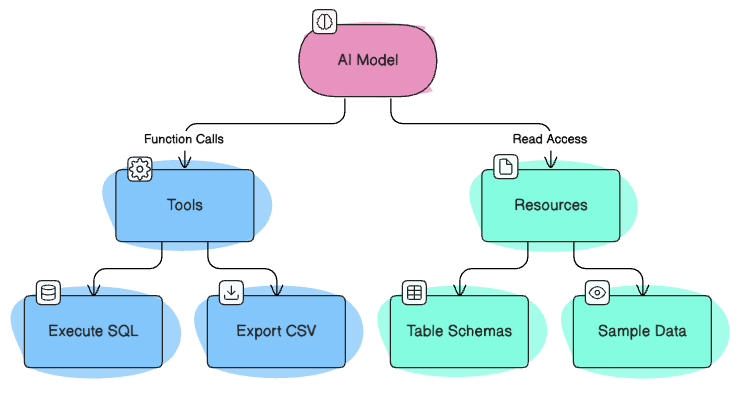
MCP works through two key components:
- Tools: Functions that AI models can call to perform actions and modify system state (like executing SQL queries, inserting data, exporting files)
- Resources: Data sources that AI models can access for information only (like table schemas, sample data, or documentation)
This direct connection eliminates the copy-paste cycle and enables truly autonomous data analysis.
What is FastMCP?
FastMCP is a Python framework that makes building MCP servers incredibly simple. While you could build MCP servers from scratch, FastMCP provides decorators and utilities that reduce the complexity to just a few lines of code.
In this article, you’ll build a database assistant that:
- Connects to SQLite databases and executes queries automatically
- Exports results to CSV files with full schema discovery
- Provides sample data and calculates database statistics
This complete solution transforms any AI assistant into a powerful database analytics tool. For large-scale analytics workloads, consider our DuckDB deep dive which offers superior performance for analytical queries.
Installation and Database Setup
Installation
To install fastmcp, type the following command:
pip install fastmcp
Other dependencies you’ll need for this article are:
pip install sqlalchemy pandas
SQLAlchemy is the Python SQL toolkit and Object-Relational Mapping (ORM) library we’ll use for database operations.
Database Setup: Sample E-commerce Data
Before building FastMCP tools, let’s create a realistic e-commerce database that we’ll use throughout all examples. The complete database setup code is available in setup_database.py.
from setup_database import create_sample_database

# Create the database we'll use throughout the article
db_path = create_sample_database("ecommerce.db")
Building Your First Database Tools
In this section, you’ll create FastMCP tools that:
- Connect to databases and manage connections
- Discover tables and database structure
- Execute queries with proper transaction handling
- Export results to CSV files
Connect to the Database
Start with creating a tool called connect_db to connect to the SQLite database. To create a tool, you need to:
- Initialize FastMCP server
- Write a Python function with your tool logic
- Add the
@mcp.tooldecorator
from fastmcp import FastMCP
from sqlalchemy import create_engine, text
from sqlalchemy.orm import sessionmaker
import pandas as pd

# Global database connection
db_engine = None
db_session_factory = None

# Initialize FastMCP server
mcp = FastMCP("Database Analytics Assistant")

@mcp.tool
def connect_db(database_path: str) -> dict:
    """Connect to an SQLite database file"""
    global db_engine, db_session_factory

    # Create new engine and session factory
    db_engine = create_engine(f"sqlite:///{database_path}")
    db_session_factory = sessionmaker(bind=db_engine)

    return {"success": True, "database_path": database_path}
FastMCP tools return JSON responses that AI assistants convert into user-friendly text. This structured approach ensures reliable data exchange between your database and AI systems. For type-safe AI responses, check out our PydanticAI guide.
Here’s what you’ll see when calling the connect_db tool with the ecommerce.db path:
JSON output:
{
    "success": true,
    "database_path": "ecommerce.db"
}
AI-generated summary:
Connected to the database at ecommerce.db
List Tables
The list_tables tool uses SQLAlchemy’s inspector to discover all tables in the connected database. This gives the AI a complete view of your database structure.
@mcp.tool
def list_tables() -> dict:
    """List all tables in the connected database"""
    global db_engine
    from sqlalchemy import inspect

    inspector = inspect(db_engine)
    table_names = inspector.get_table_names()

    return {"success": True, "tables": table_names}
Here’s the response you’ll get when calling the list_tables tool:
Human input:
Show me all tables in the ecommerce database
AI converts this to tool call: list_tables()
JSON output:
{
    "success": true,
    "tables": ["users", "orders"]
}
AI-generated summary:
The database has two tables: users and orders.
Flexible Query Execution Tool
The execute_query tool executes only SELECT queries on the connected database for security. This read-only approach prevents accidental data modification or deletion while allowing powerful data analysis and exploration.
Start by creating a helper function to check if the query is safe.
def _is_safe_query(sql: str) -> bool:
    """Check if a SQL query is safe to execute. Only SELECT queries are allowed."""
    sql_lower = sql.lower().strip()
    return sql_lower.startswith("select")
Then, create the execute_query tool.
@mcp.tool
def execute_query(sql: str, ctx: Context = None) -> Dict[str, Any]:
    """Execute a SQL query on the connected database."""
    global db_session_factory

    # Check if query is safe before execution
    if not _is_safe_query(sql):
        return {
            "success": False,
            "error": "Potentially dangerous SQL operations are not allowed. Only SELECT queries are permitted."
        }

    with db_session_factory() as session:
        # Execute the SQL query
        result = session.execute(text(sql))
        rows = result.fetchall()
        return {"success": True, "results": [dict(row._mapping) for row in rows]}
Here’s the response you’ll get when calling the execute_query tool with the SQL query:
Human input:
Show me statistics for the users table
AI converts this to:
SELECT
    COUNT(*) as total_users,
    AVG(age) as average_age,
    MIN(age) as youngest_age,
    MAX(age) as oldest_age,
    COUNT(CASE WHEN age < 30 THEN 1 END) as users_under_30,
    COUNT(CASE WHEN age >= 30 THEN 1 END) as users_30_and_over
FROM users
JSON output:
{
    "success": true,
    "results": [
        {
            "total_users": 5,
            "average_age": 32.0,
            "youngest_age": 22,
            "oldest_age": 45,
            "users_under_30": 2,
            "users_30_and_over": 3
        }
    ]
}
AI-generated summary:
Users table statistics:
| Metric | Value |
|---|---|
| Total Users | 5 |
| Average Age | 32.0 |
| Youngest User | 22 |
| Oldest User | 45 |
| Users Under 30 | 2 |
| Users 30 and Over | 3 |
Data Export Tool
The export_to_csv tool executes a SQL query and exports the results to a CSV file. This is useful for creating reports or sharing data with others.
import pandas as pd

@mcp.tool
def export_to_csv(sql: str, filename: str) -> dict:
    """Execute a SQL query and export results to CSV file"""
    global db_engine

    # Execute query and export to CSV using pandas
    df = pd.read_sql(sql, db_engine)
    df.to_csv(filename, index=False)

    return {"success": True, "filename": filename, "rows_exported": len(df)}
Here’s the response you’ll get when calling the export_to_csv tool:
Human input:
Export product sales data to a CSV file called sales_report.csv
AI converts this to:
SELECT product_name, SUM(quantity) as total_sold, SUM(price * quantity) as total_revenue
FROM orders
GROUP BY product_name
ORDER BY total_revenue DESC
JSON output:
{
    "success": true,
    "filename": "sales_report.csv",
    "rows_exported": 7
}
AI-generated summary:
Successfully exported 7 rows of product sales data to sales_report.csv
Schema Discovery with Resources
Tools require complex security validation and can fail due to database errors or malformed queries. Resources eliminate these risks by providing read-only access to metadata like schemas and sample data without query execution overhead.
In this section, you’ll create FastMCP resources that:
- Provide schema information for tables
- Provide sample data for tables
- Provide statistics for tables
Table Schema Resource with URI Patterns
The get_table_schema resource uses URI patterns to provide flexible access to table schemas. The AI can request schema information for any table by using the URI pattern schema://tables/{table_name}.
from sqlalchemy import inspect

@mcp.resource("schema://tables/{table_name}")
def get_table_schema(table_name: str) -> dict:
    """Get column information for a specific table"""
    global db_engine

    # Get database inspector
    inspector = inspect(db_engine)

    # Get column information
    columns = inspector.get_columns(table_name)

    # Build column info list
    column_info = []
    for col in columns:
        column_info.append({
            "name": col["name"],
            "type": str(col["type"]),
            "nullable": col["nullable"],
        })

    return {"table_name": table_name, "columns": column_info}
Here’s the response you’ll get when calling the get_table_schema resource:
Human input:
Show me the schema for the users table
AI accesses the resource using URI: schema://tables/users
JSON output:
{
    "table_name": "users",
    "columns": [
        {
            "name": "id",
            "type": "INTEGER",
            "nullable": false
        },
        {
            "name": "name",
            "type": "TEXT",
            "nullable": false
        },
        {
            "name": "email",
            "type": "TEXT",
            "nullable": false
        },
        {
            "name": "age",
            "type": "INTEGER",
            "nullable": true
        },
        {
            "name": "created_at",
            "type": "TIMESTAMP",
            "nullable": true
        }
    ]
}
AI-generated summary:
The users table schema:
| Column | Type | Required |
|---|---|---|
| id | INTEGER | Yes |
| name | TEXT | Yes |
| TEXT | Yes | |
| age | INTEGER | No |
| created_at | TIMESTAMP | No |
Sample Data Resource
The get_table_data resource provides sample data with pagination support. This helps the AI understand the actual data structure and content without overwhelming it with large datasets.
@mcp.resource("data://tables/{table_name}")
def get_table_data(table_name: str, limit: int = 10, offset: int = 0) -> dict:
    """Get sample rows from a specific table with pagination"""
    global db_session_factory

    with db_session_factory() as session:
        # Get sample data with pagination
        result = session.execute(
            text(f"SELECT * FROM {table_name} LIMIT :limit OFFSET :offset"),
            {"limit": limit, "offset": offset},
        )
        rows = result.fetchall()

        # Convert to dict
        data = [dict(row._mapping) for row in rows]

        return {"table_name": table_name, "sample_data": data, "rows_returned": len(data)}
Here’s the response you’ll get when calling the get_table_data resource:
Human input:
Show me sample data from the users table
AI accesses the resource using URI: data://tables/users
JSON output:
{
    "table_name": "users",
    "sample_data": [
        {
            "id": 1,
            "name": "Alice Johnson",
            "email": "alice@example.com",
            "age": 28,
            "created_at": "2023-01-15 10:30:00"
        },
        {
            "id": 2,
            "name": "Bob Smith",
            "email": "bob@example.com",
            "age": 35,
            "created_at": "2023-02-20 14:15:00"
        },
        {
            "id": 3,
            "name": "Charlie Brown",
            "email": "charlie@example.com",
            "age": 22,
            "created_at": "2023-03-10 09:45:00"
        }
    ],
    "rows_returned": 3
}
AI-generated summary:
Sample data from the users table:
| User ID | Name | Age | Created | |
|---|---|---|---|---|
| 1 | Alice Johnson | alice@example.com | 28 | 2023-01-15 |
| 2 | Bob Smith | bob@example.com | 35 | 2023-02-20 |
| 3 | Charlie Brown | charlie@example.com | 22 | 2023-03-10 |
Table Statistics Resource
The get_table_stats resource provides comprehensive statistics for a specific table. This helps the AI understand the size and composition of the table.
@mcp.resource("stats://tables/{table_name}")
def get_table_stats(table_name: str) -> dict:
    """Get comprehensive statistics for a specific table"""
    global db_engine, db_session_factory

    with db_session_factory() as session:
        # Get basic table statistics
        total_rows = session.execute(
            text(f"SELECT COUNT(*) FROM {table_name}")
        ).scalar()

    # Get column information
    inspector = inspect(db_engine)
    columns = inspector.get_columns(table_name)

    return {
        "table_name": table_name,
        "total_rows": total_rows,
        "column_count": len(columns),
    }
Here’s the response you’ll get when calling the get_table_stats resource:
Human input:
Show me statistics for the users table
AI accesses the resource using URI: stats://tables/users
JSON output:
{
    "table_name": "users",
    "total_rows": 5,
    "column_count": 5
}
AI-generated summary:
The users table contains 5 rows and has 5 columns (id, name, email, age, created_at).
Connect to MCP Clients
Now that you’ve built all the tools and resources, let’s deploy your FastMCP database server and connect it to an MCP client.
An MCP client is any application that can communicate with MCP servers to access tools and resources, such as Claude Code, Claude Desktop, Cursor, Zed, Continue, and other MCP-compatible development tools.
Create the Server File
First, combine all the code from this article into a single file called database_mcp_server.py. You can find the complete implementation in the example repository.
Install Dependencies
Install UV (the fast Python package manager) if you haven’t already:
curl -LsSf https://astral.sh/uv/install.sh | sh
Use uv (the fast Python package manager) to install all dependencies:
uv sync
Connect with MCP Clients
This FastMCP server works with any MCP-compatible client. Here’s how to connect it to Claude Code and other MCP clients.
Connect to Claude Code
Add your server to Claude Code’s MCP configuration:
claude mcp add database-analytics -- uv run database_mcp_server.py
Verify the server is registered:
claude mcp list
Connect to Claude Desktop
Add this configuration to your Claude Desktop config file:
{
  "mcpServers": {
    "database-analytics": {
      "command": "uv",
      "args": ["run", "database_mcp_server.py"],
      "cwd": "/path/to/your/project"
    }
  }
}
Connect to other MCP clients
Popular MCP-compatible clients include Cursor, Zed, Continue, and Codeium. Each client has its own configuration format but uses the same server command: uv run database_mcp_server.py. For client-specific setup guides, visit the Model Context Protocol documentation.
Test the Server
Once your FastMCP server is running and connected to an MCP client, you can test all the database functionality through natural language commands. Here are practical examples to verify everything works:
Connect to the database:
Connect to my SQLite database at ./ecommerce.db
Output:
✅ Connected to the database at ./ecommerce.db
Explore the schema:
What tables are available in this database?
Output:
The database has 2 tables: users and orders.
Examine the table structure:
Show me the schema for the users table
Output:
The users table has 5 columns: id (INTEGER, required), name (TEXT, required), email (TEXT, required), age (INTEGER, optional), and created_at (TIMESTAMP, optional).
Preview the data:
Show me some sample data from the users table
Output:
Here are 3 sample users:
- Alice Johnson (alice@example.com, age 28)
- Bob Smith (bob@example.com, age 35)
- Charlie Brown (charlie@example.com, age 22)
Run analytics queries:
Calculate total sales by product category
Output:
Product sales summary:
- Laptop: $999.99 (1 sold)
- Tablet: $499.99 (1 sold)
- Monitor: $299.99 (1 sold)
- Headphones: $149.99 (1 sold)
Export the results:
Export the query "SELECT product_name, SUM(quantity) as total_sold FROM orders GROUP BY product_name" to CSV file called sales_report.csv
Output:
✅ Successfully exported 7 rows of product sales data to sales_report.csv
Get table statistics:
Show me statistics for the users table
Output:
Users table statistics: 5 total rows, 5 columns
Conclusion
You’ve successfully built a complete FastMCP database server that transforms how AI assistants interact with databases. Your server delivers:
- Direct database connectivity for AI assistants
- Flexible query execution with proper transaction handling
- Automated data export to CSV files
- Comprehensive schema discovery and data exploration
- Real-time database statistics and analysis
The best way to learn is to build. Try building your own FastMCP server with different database types, tools, and resources. Here are some ideas to get you started:
- Extend the server with additional database operations (INSERT, UPDATE, DELETE)
- Add support for multiple database types (PostgreSQL, MySQL, etc.)
- Implement advanced analytics tools for statistical analysis such as data visualization, clustering, and anomaly detection
- Coordinate multiple AI agents for complex data workflows using LangGraph
📚 Want to go deeper? Learning new techniques is the easy part. Knowing how to structure, test, and deploy them is what separates side projects from real work. My book shows you how to build data science projects that actually make it to production. Get the book →
Stay Current with CodeCut
Actionable Python tips, curated for busy data pros. Skim in under 2 minutes, three times a week.


5 thoughts on “Stop Writing SQL for AI Agents: Build Direct Database Access with FastMCP”
Great article!, I am gong to try this right away. Thank you! 🙂
One feedback though, instead of using Claude Desktop as MCP client , it would have been great if you could show it using
Gradio / Streamlit / React UI , in that way we don’t dependent on any vendor specific applications to implement MCP.
Thanks for the feedback! I still think Claude Desk as an MCP client is a good use case for development. I will create add another section for the article or add another follow up article “Building a Web Database Assistant with FastMCP and Streamlit.”
I’m getting the following failure while running example_usage.py
e:\AI\MCP\database-analytics-mcp-main\setup_database.py:22: MovedIn20Warning: The “declarative_base()“ function is now available as sqlalchemy.orm.declarative_base(). (deprecated since: 2.0) (Background on SQLAlchemy 2.0 at: https://sqlalche.me/e/b8d9)
Base = declarative_base()
Database Analytics MCP Server – Example Usage
==================================================
Using existing database: ecommerce.db
Traceback (most recent call last):
File “e:\AI\MCP\database-analytics-mcp-main\example_usage.py”, line 111, in
asyncio.run(main())
~~~~~~~~~~~^^^^^^^^
File “C:\Users\502435054\AppData\Local\Programs\Python\Python313\Lib\asyncio\runners.py”, line 195, in run
File “C:\Users\502435054\AppData\Local\Programs\Python\Python313\Lib\asyncio\runners.py”, line 195, in run
return runner.run(main)
return runner.run(main)
~~~~~~~~~~^^^^^^
~~~~~~~~~~^^^^^^
Thanks for letting me know. I will look into this
I applied a minor fix. Can you pull the changes and try again?