Table of Contents
- Why You Need a Maintainable Data Science Project
- Introducing the Data Science Template
- Get Started
- Install Dependencies
- Check Issues in Your Code Before Committing
- Manage Configuration Files with Hydra
- Add API Documentation
- Conclusion
Why You Need a Maintainable Data Science Project
Building a maintainable data science project is essential for keeping your work clear, extensible, and reproducible over time. Without a strong structure, projects tend to become messy, leading to duplicated code, complicated debugging, and frustration when new collaborators join.
Establishing an effective structure from the beginning addresses many of these issues. However, designing that structure from scratch can be challenging.
Stay Current with CodeCut
Actionable Python tips, curated for busy data pros. Skim in under 2 minutes, three times a week.
Key Takeaways
Here’s what you’ll learn:
- Structure data science projects for maximum maintainability and team collaboration
- Use automated code quality checks with pre-commit hooks to prevent bugs before commits
- Manage configurations with Hydra to eliminate hard-coding and enhance reproducibility
- Generate API documentation automatically from code docstrings using pdoc
- Choose the right dependency manager between pip, Poetry, and uv for your project needs
Introducing the Data Science Template
To solve this, I developed the data science template, a ready-to-use framework that embeds industry best practices. This template results from my years refining how data science projects should be organized to be clean, transparent, and collaborative.
I created this repo years ago. I recently updated the template to include uv, a lightning-fast Python package installer, and refreshed versions of core libraries to ensure compatibility with the latest tools.
📚 For comprehensive project structure guidelines and organization patterns, check out Production-Ready Data Science.
The tools used in this template are:
- Poetry: A tool for dependency management and packaging in Python that creates isolated environments.
- uv: An extremely fast Python package installer and resolver, an alternative to pip and poetry’s installer.
- pip: The standard package installer for Python, used to install and manage libraries.
- Hydra: A flexible framework to manage configurations for complex applications, particularly useful for data science and machine learning projects.
- Pre-commit plugins: A framework for managing and maintaining multi-language pre-commit hooks to ensure code quality.
- Pdoc: A simple yet powerful tool for generating API documentation for Python projects.
Get Started
To download the template, start with installing Cookiecutter:
pip install cookiecutter
Create a project based on the template:
cookiecutter https://github.com/khuyentran1401/data-science-template
You will be prompted to specify important project details such as project name, author, preferred dependency manager, and compatible Python versions at the time of creation:
You've downloaded /Users/khuyentran/.cookiecutters/data-science-template before. Is it okay to delete and re-download it? [y/n] (y):
  [1/4] project_name (Project Name): customer_segmentation
  [2/4] author_name (Your Name): Khuyen Tran
  [3/4] Select dependency_manager
    1 - pip
    2 - poetry
    3 - uv
    Choose from [1/2/3] (1): 3
  [4/4] compatible_python_versions (>=3.9):
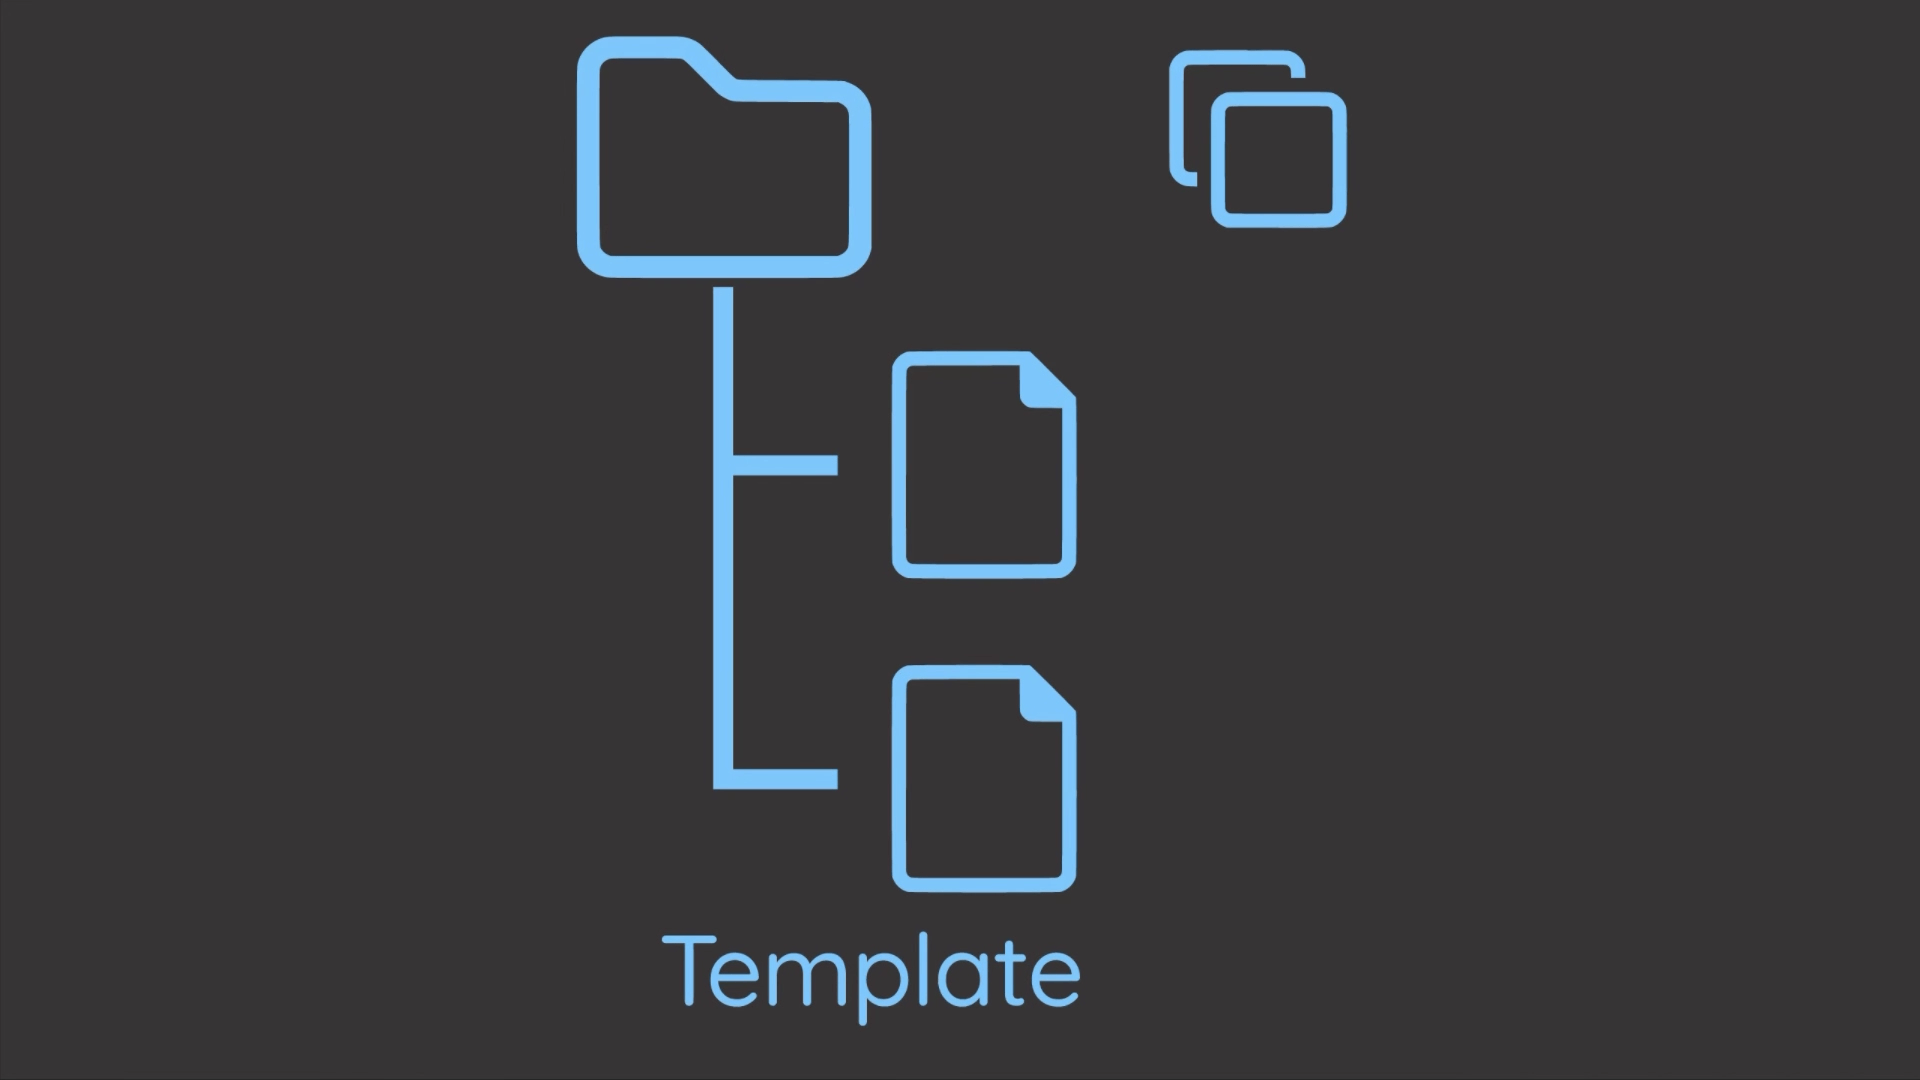
Now a project with the specified name is created in your current directory! If you choose uv as the dependency management tool, the structure of the project should look like the below:
.
├── config
│   ├── main.yaml                   # Main configuration file
│   ├── model                       # Configurations for training model
│   │   ├── model1.yaml             # First variation of parameters to train model
│   │   └── model2.yaml             # Second variation of parameters to train model
│   └── process                     # Configurations for processing data
│       ├── process1.yaml           # First variation of parameters to process data
│       └── process2.yaml           # Second variation of parameters to process data
├── data
│   ├── final                       # data after training the model
│   ├── processed                   # data after processing
│   └── raw                         # raw data
├── docs                            # documentation for your project
├── .gitignore                      # ignore files that cannot commit to Git
├── models                          # store models
├── notebooks                       # store notebooks
├── .pre-commit-config.yaml         # configurations for pre-commit
├── .python-version                 # specify Python version for the project
├── pyproject.toml                  # project metadata and dependencies
├── README.md                       # describe your project
├── src                             # store source code
│   ├── __init__.py                 # make src a Python module
│   ├── process.py                  # process data before training model
│   ├── train_model.py              # train model
│   └── utils.py                    # store helper functions
└── tests                           # store tests
    ├── __init__.py                 # make tests a Python module
    ├── test_process.py             # test functions for process.py
    └── test_train_model.py         # test functions for train_model.py
Install Dependencies
Depending on which dependency manager you selected when setting up the project, follow the instructions below:
| Tool | Speed | Virtual Environment Support | Ease of Use | Best For |
|---|---|---|---|---|
| pip | Standard speed | No | Very easy | Simple projects, maximum compatibility |
| Poetry | Moderate | Yes | Easy | Managing isolated environments and packaging |
| uv | Extremely fast | Yes | Easy | Fast installation and modern dependency management |
pip
pip is the standard Python package installer.
First, create and activate a virtual environment:
python -m venv .venv
source .venv/bin/activate  # On macOS/Linux
.venv\Scripts\activate     # On Windows
To install all dependencies:
pip install -r requirements-dev.txt
To install only production dependencies:
pip install -r requirements.txt
To run a Python script:
python3 src/process.py
Poetry
Poetry is a dependency management tool that simplifies the creation of isolated environments and manages your packages efficiently.
To activate the virtual environment:
poetry shell
To install all project dependencies from pyproject.toml:
poetry install
To install only production dependencies:
poetry install --only main
To add a new library:
poetry add <library-name>
To run a Python script:
poetry run python src/process.py
uv
uv is an ultra-fast Python package installer and resolver.
To install all dependencies from pyproject.toml:
uv sync --all-extras
To install only production dependencies:
uv sync
To add a new package:
uv add <library-name>
To run a Python script:
uv run src/process.py
Check Issues in Your Code Before Committing
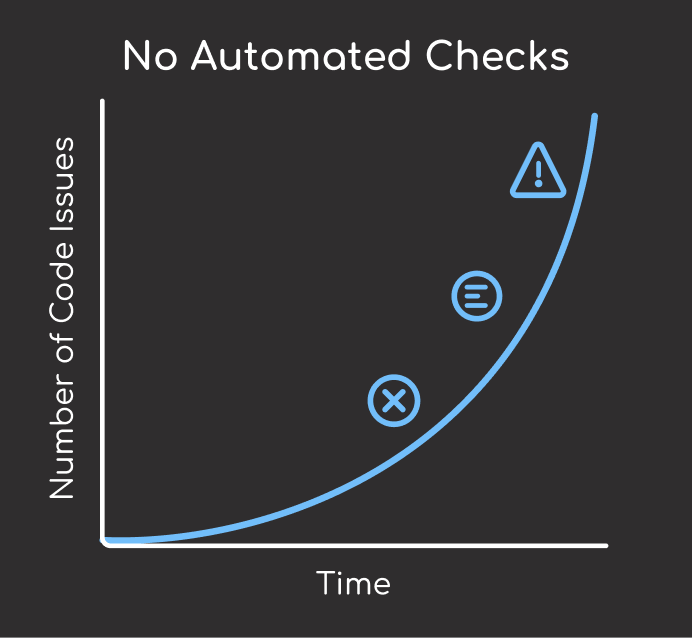
Maintaining code quality manually can be tedious and error-prone. Without automated checks, it’s easy to accidentally commit code with formatting inconsistencies, linting errors, or type mismatches. Over time, these minor issues can accumulate, making your codebase harder to maintain and collaborate on.
Set Up Pre-commit Hooks
To avoid these problems, use Pre-commit to automate code checking before commits.
Pre-commit uses a .pre-commit-config.yaml file to define hooks that automatically run when you make a commit, checking your code for formatting, linting, and typing issues before the commit is accepted.
Developer writes code
         │
         ▼
┌─────────────────┐
│  git commit -m  │ ──────────┐
│ "my changes"    │           │
└─────────────────┘           │
                              │
                              ▼
                    ┌─────────────────┐
                    │  Pre-commit     │
                    │  Hooks Trigger  │
                    └─────────────────┘
                              │
                              ▼
           ┌──────────────────────────────────────┐
           │          Automated Checks            │
           │      ┌─────────┐     ┌─────────┐     │
           │      │  Ruff   │     │ MyPy    │     │
           │      │ Linting │     │  Type   │     │
           │      └─────────┘     └─────────┘     │
           └──────────────────────────────────────┘
                              │
                 ┌────────────┴────────────┐
                 ▼                         ▼
        ┌─────────────────┐       ┌─────────────────┐
        │   ✅ All Pass   │       │  ❌ Issues Found│
        │                 │       │                 │
        │ Commit Success  │       │ Commit Blocked  │
        └─────────────────┘       └─────────────────┘
                                           │
                                           ▼
                                  ┌─────────────────┐
                                  │   Fix Issues    │
                                  │   Try Again     │
                                  └─────────────────┘
This template uses the following hooks:
- Ruff: An extremely fast Python linter, written in Rust. It supports 500 lint rules, many of which are inspired by popular tools like Flake8, isort, pyupgrade, and others.
- mypy: Static type checking for Python to catch type-related errors before runtime
repos:
  - repo: https://github.com/charliermarsh/ruff-pre-commit
    rev: v0.11.6
    hooks:
      - id: ruff
        args: [--fix]
  - repo: https://github.com/pre-commit/mirrors-mypy
    rev: v1.15.0
    hooks:
      - id: mypy
Configure Ruff Settings
To get the most out of Ruff, configure it through your pyproject.toml file. This controls how Ruff analyzes and formats your code during pre-commit checks:
[tool.ruff]
# Exclude a variety of commonly ignored directories.
exclude = [...]

# Same as Black.
line-length = 88

[tool.ruff.lint]
ignore = ["E501", "E402"]
select = ["B","C","E","F","W","B9", "I", "Q"]

[tool.ruff.format]
quote-style = "double"
indent-style = "space"
skip-magic-trailing-comma = false

[tool.ruff.lint.mccabe]
max-complexity = 10
Key sections explained:
[tool.ruff]: Basic settings like excluded directories and line length compatibility with Black[tool.ruff.lint]: Controls which lint rules to ignore and select for code analysis[tool.ruff.format]: Formatting preferences for consistent code style across your project[tool.ruff.lint.mccabe]: Complexity checking to automatically flag overly complex functions
Install and Use Pre-commit
To add pre-commit to git hooks:
pre-commit install
Now, whenever you run git commit, your code will be automatically checked and reformatted before being committed:
git commit -m 'my commit'
Output:
ruff.......................................Failed
- hook id: ruff
- exit code: 1
Found 3 errors (3 fixed, 0 remaining).
mypy.......................................Failed
- src/process.py:13: error: Incompatible types in assignment
  (expression has type "int", variable has type "str")

[ERROR] `mypy` failed. Fix errors and try again.
Manage Configuration Files with Hydra
It is essential to avoid hard-coding as it gives rise to various issues:
- Maintainability: If values are scattered throughout the codebase, updating them consistently becomes harder.
- Reusability: Hardcoding values limits the reusability of code for different scenarios.
- Security concerns: Hardcoding sensitive information like passwords or API keys directly into the code can be a security risk.
- Testing and debugging: Hardcoded values can make testing and debugging more challenging.
Configuration files solve these problems by storing parameters separately from the code, which enhances code maintainability and reproducibility.
Hydra stands out as an excellent configuration management tool because of its impressive set of features, including convenient parameter access and command-line configuration override.
Suppose the “main.yaml” file located in the “config” folder looks like this:
# config/main.yaml
process:
  use_columns:
  - col1
  - col2
model:
  name: model1
data:
  raw: data/raw/sample.csv
  processed: data/processed/processed.csv
  final: data/final/final.csv
Within a Python script, you can effortlessly access a configuration file by applying a single decorator to your Python function. By using the dot notation (e.g., config.data.raw), you can conveniently access specific parameters from the configuration file:
import hydra
from omegaconf import DictConfig

@hydra.main(config_path="../config", config_name="main", version_base="1.2")
def process_data(config: DictConfig):
    """Function to process the data"""

    print(f"Process data using {config.data.raw}")
    print(f"Columns used: {config.process.use_columns}")

if __name__ == "__main__":
    process_data()
To override configuration from the command line:
python src/processs_data.py data.raw=sample2.csv
Output:
Process data using sample2.csv
Columns used: ['col1', 'col2']
Add API Documentation
As data scientists often collaborate with other team members on projects, it is important to create comprehensive documentation for these projects. However, manually creating documentation can be time-consuming.
This template leverages pdoc to generate API documentation based on the docstrings of your Python files and objects.
To generate static documentation:
pdoc src -o docs
To start documentation server (available at http://localhost:8080):
pdoc src --http localhost:8080
Navigate to http://localhost:8080 to access the documentation in your web browser.
Conclusion
You have just learned how to structure your data science project using a data science template. This template is designed to be flexible. Feel free to adjust the project based on your applications.
The combination of proper project structure, automated code quality checks, flexible configuration management, and automatic documentation generation creates a maintainable foundation for any data science project.
Related Resources
For deeper exploration of project organization and workflow:
- Configuration Management: Hydra configuration guide for managing parameters and avoiding hard-coding
- Version Control: Git for data scientists guide for tracking code changes and collaboration
- Data Versioning: DVC version control guide for versioning datasets and machine learning models
📚 Want to go deeper? Learning new techniques is the easy part. Knowing how to structure, test, and deploy them is what separates side projects from real work. My book shows you how to build data science projects that actually make it to production. Get the book →
Stay Current with CodeCut
Actionable Python tips, curated for busy data pros. Skim in under 2 minutes, three times a week.