
Table of Contents
- Motivation
- What is Manim?
- Create a Blue Square that Grows from the Center
- Turn a Square into a Circle
- Customize Manim
- Write Mathematical Equations with a Moving Frame
- Moving and Zooming Camera
- Graph
- Move Objects Together
- Trace Path
- Recap
Motivation
Have you ever struggled with math concepts in a machine learning algorithm and turned to 3Blue1Brown as a learning resource? 3Blue1Brown is a popular math YouTube channel created by Grant Sanderson, known for exceptional explanations and stunning animations.
What if you could create similar animations to explain data science concepts to your teammates, managers, or followers?
Grant developed a Python package called Manim that enables you to create mathematical animations or pictures using Python. In this article, you will learn how to create beautiful mathematical animations using Manim.
💻 Get the Code: The complete source code and Jupyter notebook for this tutorial are available on GitHub. Clone it to follow along!
Stay Current with CodeCut
Actionable Python tips, curated for busy data pros. Skim in under 2 minutes, three times a week.
What is Manim?
Manim is an animation engine for creating precise, explanatory math videos. Note that there are two versions of Manim:
Since the Manim Community version is updated more frequently and better tested, we’ll use it for this tutorial.
To install the dependencies for the package, visit the Documentation. After the dependencies are installed, run:
pip install manim
Create a Blue Square that Grows from the Center
We’ll start by creating a blue square that grows from the center:
from manim import *

class GrowingSquare(Scene):
    def construct(self):
        square = Square(color=BLUE, fill_opacity=0.5)
        self.play(GrowFromCenter(square))
        self.wait()
The code leverages four key Manim elements to produce the animation.
- Scene: Base class providing animation infrastructure via
construct()andplay()methods - Square(color, fill_opacity): Mobject for creating squares with specified stroke color and fill transparency
- GrowFromCenter: Growth animation starting from the object’s center
- wait(): 1-second pause in animation timeline
Save the script above as start.py. Now run the command below to generate a video for the script:
manim -p -ql start.py GrowingSquare
A video called GrowingSquare.mp4 will be saved in your local directory. You should see a blue square growing from the center.

Explanation of the options:
-p: play the video once it finishes generating-ql: generate a video with low quality
To generate a video with high quality, use -qh instead.
To create a GIF instead of a video, add --format=gif to the command:
manim -p -ql --format=gif start.py GrowingSquare
Turn a Square into a Circle
Creating a square alone is not that exciting. Let’s transform the square into a circle using the Transform animation.
from manim import *

class SquareToCircle(Scene):
    def construct(self):
        circle = Circle()
        circle.set_fill(PINK, opacity=0.5)

        square = Square()
        square.rotate(PI / 4)

        self.play(Create(square))
        self.play(Transform(square, circle))
        self.play(FadeOut(square))

This code demonstrates creating shapes, styling them, and applying different animation effects.
- Circle: Creates a circular shape
- set_fill(color, opacity): Sets the fill color and transparency (0.5 = 50% transparent)
- rotate(angle): Rotates the object by an angle (PI/4 = 45 degrees)
- Create: Animation that draws the shape onto the screen
- Transform: Smoothly morphs one shape into another
- FadeOut: Makes the object gradually disappear
Find a comprehensive list of shapes in the Manim geometry documentation.
Customize Manim
If you don’t want the background to be black, you can change it to white using self.camera.background_color:
from manim import *

class CustomBackground(Scene):
    def construct(self):
        self.camera.background_color = WHITE

        square = Square(color=BLUE, fill_opacity=0.5)
        circle = Circle(color=RED, fill_opacity=0.5)

        self.play(Create(square))
        self.wait()
        self.play(Transform(square, circle))
        self.wait()

Find other ways to customize Manim in the configuration documentation.
Write Mathematical Equations with a Moving Frame
You can create animations that write mathematical equations using the MathTex class:
from manim import *

class WriteEquation(Scene):
    def construct(self):
        equation = MathTex(r"e^{i\pi} + 1 = 0")

        self.play(Write(equation))
        self.wait()

This code demonstrates writing mathematical equations using LaTeX.
- MathTex: Creates mathematical equations using LaTeX notation (the
rprefix indicates a raw string for LaTeX commands) - Write: Animation that makes text appear as if being written by hand
Or show step-by-step solutions to equations:
from manim import *

class EquationSteps(Scene):
    def construct(self):
        step1 = MathTex(r"2x + 5 = 13")
        step2 = MathTex(r"2x = 8")
        step3 = MathTex(r"x = 4")

        self.play(Write(step1))
        self.wait()
        self.play(Transform(step1, step2))
        self.wait()
        self.play(Transform(step1, step3))
        self.wait()

Let’s break down this code:
- Three equation stages: Separate MathTex objects for each step of the solution
- Progressive transformation:
Transformmorphs the first equation through intermediate and final stages - Timed pauses:
wait()creates natural breaks between steps for a teaching pace
You can also highlight specific parts of equations using frames:
from manim import *

class MovingFrame(Scene):
    def construct(self):
        # Write equations
        equation = MathTex("2x^2-5x+2", "=", "(x-2)(2x-1)")

        # Create animation
        self.play(Write(equation))

        # Add moving frames
        framebox1 = SurroundingRectangle(equation[0], buff=.1)
        framebox2 = SurroundingRectangle(equation[2], buff=.1)

        # Create animations
        self.play(Create(framebox1))

        self.wait()
        # Replace frame 1 with frame 2
        self.play(ReplacementTransform(framebox1, framebox2))

        self.wait()

In this code, we use the following elements:
- MathTex with multiple arguments: Breaks the equation into separate parts that can be individually accessed and highlighted
- SurroundingRectangle(mobject, buff): Creates a box around an equation part (buff=0.1 sets the space between the box and the content)
- ReplacementTransform: Smoothly moves and morphs one frame into another, replacing the first frame with the second
Moving and Zooming Camera
You can adjust the camera and select which part of the equations to zoom in using a class inherited from MovingCameraScene:
from manim import *

class MovingCamera(MovingCameraScene):
    def construct(self):
        equation = MathTex(
            r"\frac{d}{dx}(x^2) = 2x"
        )

        self.play(Write(equation))
        self.wait()

        # Zoom in on the derivative
        self.play(
            self.camera.frame.animate.scale(0.5).move_to(equation[0])
        )
        self.wait()

This code shows how to zoom in on specific parts of your animation.
- MovingCameraScene: A special scene type that allows the camera to move and zoom
- self.camera.frame: Represents the camera’s view that you can move and zoom
- animate.scale(0.5): Zooms in by making the camera view 50% smaller (objects appear twice as big)
- move_to(equation[0]): Centers the camera on the first part of the equation
Graph
You can use Manim to create annotated graphs:
from manim import *

class Graph(Scene):
    def construct(self):
        axes = Axes(
            x_range=[-3, 3, 1],
            y_range=[-5, 5, 1],
            x_length=6,
            y_length=6,
        )

        # Add labels
        axes_labels = axes.get_axis_labels(x_label="x", y_label="f(x)")

        # Create a function graph
        graph = axes.plot(lambda x: x**2, color=BLUE)
        graph_label = axes.get_graph_label(graph, label="x^2")

        self.add(axes, axes_labels)
        self.play(Create(graph))
        self.play(Write(graph_label))
        self.wait()
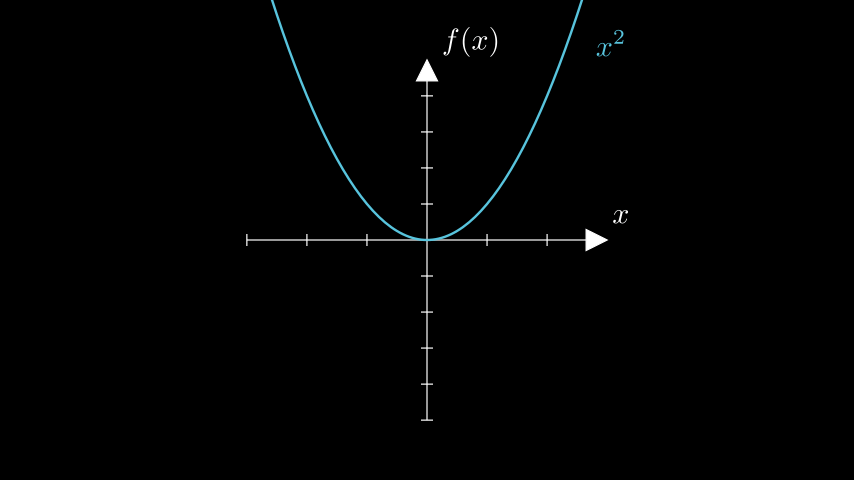
This code shows how to create mathematical function graphs with labeled axes.
- Axes: Creates a coordinate grid with specified ranges (e.g., x from -3 to 3, y from -5 to 5) and sizes
- get_axis_labels: Adds “x” and “f(x)” labels to the coordinate axes
- plot(lambda x: x2)**: Plots a mathematical function (here, x squared) as a curve on the axes
- get_graph_label: Adds a label showing the function’s equation next to the plotted curve
- self.add: Instantly displays objects on screen without animating them in
If you want to get an image of the last frame of a scene, add -s to the command:
manim -p -qh -s more.py Graph
You can also animate the process of setting up the axes:
manim -p -qh more.py Graph
Move Objects Together
You can use VGroup to group different Manim objects and move them together:
from manim import *

class MoveObjectsTogether(Scene):
    def construct(self):
        square = Square(color=BLUE)
        circle = Circle(color=RED)

        # Group objects
        group = VGroup(square, circle)
        group.arrange(RIGHT, buff=1)

        self.play(Create(group))
        self.wait()

        # Move the entire group
        self.play(group.animate.shift(UP * 2))
        self.wait()

This code shows how to group objects and move them together as one unit.
- VGroup: Groups multiple objects together so you can control them all at once (like selecting multiple items)
- arrange(RIGHT, buff=1): Lines up the objects horizontally from left to right with 1 unit of space between them
- shift(UP * 2): Moves the entire group upward by 2 units (multiplying by 2 makes it move twice as far)
You can also create multiple groups and manipulate them independently or together:
from manim import *

class GroupCircles(Scene):
    def construct(self):
        # Create circles
        circle_green = Circle(color=GREEN)
        circle_blue = Circle(color=BLUE)
        circle_red = Circle(color=RED)

        # Set initial positions
        circle_green.shift(LEFT)
        circle_blue.shift(RIGHT)

        # Create 2 different groups
        gr = VGroup(circle_green, circle_red)
        gr2 = VGroup(circle_blue)
        self.add(gr, gr2)
        self.wait()

        # Shift 2 groups down
        self.play((gr + gr2).animate.shift(DOWN))

        # Move only 1 group
        self.play(gr.animate.shift(RIGHT))
        self.play(gr.animate.shift(UP))

        # Shift 2 groups to the right
        self.play((gr + gr2).animate.shift(RIGHT))
        self.play(circle_red.animate.shift(RIGHT))
        self.wait()
Trace Path
You can use TracedPath to create a trace of a moving object:
from manim import *

class TracePath(Scene):
    def construct(self):
        dot = Dot(color=RED)

        # Create traced path
        path = TracedPath(dot.get_center, stroke_color=BLUE, stroke_width=4)
        self.add(path, dot)

        # Move the dot in a circular pattern
        self.play(
            MoveAlongPath(dot, Circle(radius=2)),
            rate_func=linear,
            run_time=4
        )
        self.wait()
This code shows how to create a trail that follows a moving object.
- Dot: A small circular point that you can move around
- TracedPath(dot.get_center): Creates a line that draws itself following the dot’s path (like a pen trail)
- get_center: Gets the current position of the dot so TracedPath knows where to draw
- MoveAlongPath(dot, Circle(radius=2)): Moves the dot along a circular path with radius 2
- rate_func=linear: Makes the dot move at a constant speed (no speeding up or slowing down)
- run_time=4: The animation takes 4 seconds to complete
For a more complex example, you can create a rolling circle that traces a cycloid pattern:
from manim import *

class RollingCircleTrace(Scene):
    def construct(self):
        # Create circle and dot
        circ = Circle(color=BLUE).shift(4*LEFT)
        dot = Dot(color=BLUE).move_to(circ.get_start())

        # Group dot and circle
        rolling_circle = VGroup(circ, dot)
        trace = TracedPath(circ.get_start)

        # Rotate the circle
        rolling_circle.add_updater(lambda m: m.rotate(-0.3))

        # Add trace and rolling circle to the scene
        self.add(trace, rolling_circle)

        # Shift the circle to 8*RIGHT
        self.play(rolling_circle.animate.shift(8*RIGHT), run_time=4, rate_func=linear)
This code creates a rolling wheel animation that draws a curved pattern as it moves.
- Setup: Creates a blue circle at the left side and places a blue dot at the circle’s edge
- Grouping: Uses
VGroupto combine the circle and dot so they move together - Path tracking:
TracedPathwatches the circle’s starting point and draws a line following it - Continuous rotation:
add_updatermakes the circle rotate automatically every frame, creating the rolling effect - Rolling motion: As the group shifts right, the rotation updater makes it look like a wheel rolling across the screen
- Cycloid pattern: The traced path creates a wave-like curve showing the mathematical path a point on a rolling wheel makes
Recap
Congratulations! You have just learned how to use Manim and what it can do. To recap, there are three kinds of objects that Manim provides:
- Mobjects: Objects that can be displayed on the screen, such as
Circle,Square,Matrix,Angle, etc. - Scenes: Canvas for animations such as
Scene,MovingCameraScene, etc. - Animations: Animations applied to Mobjects such as
Write,Create,GrowFromCenter,Transform, etc.
There is so much more Manim can do that I cannot cover here. The best way to learn is through practice, so I encourage you to try the examples in this article and check out Manim’s tutorial.
📚 Want to go deeper? Learning new techniques is the easy part. Knowing how to structure, test, and deploy them is what separates side projects from real work. My book shows you how to build data science projects that actually make it to production. Get the book →
Stay Current with CodeCut
Actionable Python tips, curated for busy data pros. Skim in under 2 minutes, three times a week.