Table of Contents
- Why Choose Git for Your Data Science Project?
- How to Use Git
- Good Practices
- Tools to Complement Git
- Conclusion
Why Choose Git for Your Data Science Project?
Git is a version control system widely used in software development, but is it the right choice for your data science project? Absolutely.
Here are some reasons why Git is invaluable for data science:
Version Control
Scenario:
You replace the current data processing technique with a new approach. After realizing that the new approach is not producing the desired results, you want to revert back to a previous working version. Unfortunately, without version control, it becomes a daunting task to undo multiple changes.
Solution:
With Git, you can track changes to your codebase, switch between different versions, compare changes, and roll back to a stable state if necessary.

Collaboration
Scenario:
You collaborate with other data scientists on a machine-learning project. To merge all changes made by team members, you need to manually exchange files and review each other’s code, which takes time and effort.
Solution:
Git makes it easy to merge changes, resolve conflicts, and synchronize progress, allowing you and your team members to work more efficiently together.

Branching
Scenario:
You want to explore new approaches to enhance your model’s performance but are hesitant to make changes directly to the production code. Any unintended impact on the deployed model could have significant consequences for your company.
Solution:
With Git’s branching, you can create separate branches for different features. This allows you to test and iterate without compromising the stability of the production branch.
Backup
Scenario:
A hardware failure or theft results in the loss of all your code, leaving you devastated and setting you back months of work.
Solution:
Git backs up your projects by securely storing them on remote repositories. Thus, even if you encounter such unfortunate events, you can restore your codebase from the remote repository and continue your work without losing significant progress.

Stay Current with CodeCut
Easy-to-digest articles on Python, AI, and open-source tools. Delivered twice a week.
Key Takeaways
Here’s what you’ll learn:
- Track and revert code changes safely without losing work using version control
- Collaborate efficiently with team members using branching and pull requests
- Create separate development branches to experiment without affecting production code
- Implement automated backup through remote repositories for disaster recovery
- Apply Git best practices like small commits and descriptive branch names
How to Use Git
Now that we understand the value of Git in a data science project, let’s explore how we can effectively use it in different scenarios.
📚 For comprehensive Git workflows in production data science environments, check out Production-Ready Data Science.
Initialize Git
To initialize Git in your current project and upload your project to a remote repository, follow these steps:
First, initialize a new Git repository in the project directory:
Next, add a remote repository to your local Git repository. To use GitHub as the remote repository, create a new repository on GitHub and copy its URL.

Then, add the URL to your local Git repository with the name “origin”:
git remote add origin <repository URL>
Next, stage changes or new files in your Git repository:
# Add all changes in the current directory
git add .
git status
Changes to be committed:
  (use "git rm --cached <file>..." to unstage)
        new file:   .dvc/.gitignore
        new file:   .dvc/config
        new file:   .flake8
        new file:   .gitignore
        new file:   .pre-commit-config.yaml
        new file:   Makefile
        new file:   config/main.yaml
        new file:   config/model/model1.yaml
        new file:   config/model/model2.yaml
        new file:   config/process/process1.yaml
        new file:   config/process/process2.yaml
        new file:   data/final/.gitkeep
        new file:   data/processed/.gitkeep
        new file:   data/raw.dvc
        new file:   data/raw/.gitkeep
        new file:   docs/.gitkeep
        new file:   models/.gitkeep
        new file:   notebooks/.gitkeep
        new file:   pyproject.toml
        new file:   src/__init__.py
        new file:   src/process.py
        new file:   src/train_model.py
        new file:   tests/__init__.py
        new file:   tests/test_process.py
        new file:   tests/test_train_model.py
git commit -m 'init commit'
Once your commits are made and stored in your local repository, you can share your changes with others by pushing them to a remote repository.
# push to the "main" branch on the "origin" repository
git push origin main
After running this command, the “main” branch on the remote repository will receive the latest changes from your local repository.

Contribute to an Existing Project
git clone <repository URL>
This command will create a new repository with the same name as the remote repository. To access the files, navigate to the repository directory:
It is a good practice to make changes on a separate branch rather than the “main” branch to avoid any impact on the main codebase.
Create and switch to a new branch using:
git checkout -b <branch-name>
Make some changes to the new branch, then add, commit, and push the changes to the new branch on the remote Git repository:
git add .
git commit -m 'print finish in process_data'
git push origin <branch-name>
After pushing the commit, you can create a pull request to merge the changes into the “main” branch.

After your colleague approves and merges your pull request, your code will be integrated into the “main” branch.
Merge Local Changes with Remote Changes
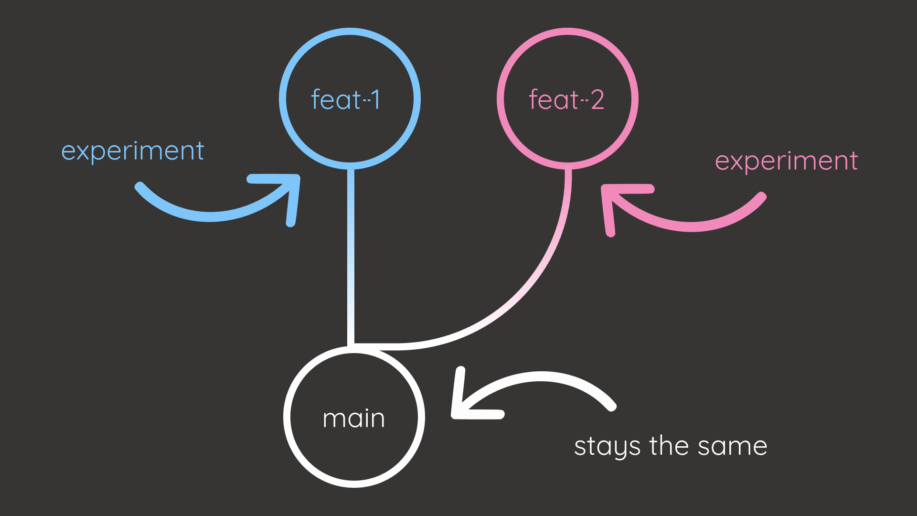
Imagine that you have created a branch called “feat-2” from the main branch. After making several changes to the “feat-2” branch, you discovered that the main branch has been updated. How do you merge the remote changes from the main branch into the local branch?

First, make sure your local work is saved by staging and committing local changes.
git add .
git commit -m 'commit-2'
This prevents the remote changes from overriding your work.
Next, pull the changes from the main branch on the remote repository using git pull. When executing this command for the first time, you will be prompted to choose a strategy for reconciling the branches. Here are the available options:
$ git pull origin main
From https://github.com/khuyentran1401/test-git
 * branch            main       -> FETCH_HEAD
hint: You have divergent branches and need to specify how to reconcile them.
hint: You can do so by running one of the following commands sometime before
hint: your next pull:
hint:
hint:   git config pull.rebase false  # merge
hint:   git config pull.rebase true   # rebase
hint:   git config pull.ff only       # fast-forward only
hint:
hint: You can replace "git config" with "git config --global" to set a default
hint: preference for all repositories. You can also pass --rebase, --no-rebase,
hint: or --ff-only on the command line to override the configured default per
hint: invocation.
fatal: Need to specify how to reconcile divergent branches.
Running git pull origin main –no-rebase will create a new merge commit in the “feat-2” branch that ties together the histories of the “main” branch and the “feat-2” branch.

Running git pull origin main –rebase will perform a rebase operation, which places the commits from the “feat-2” branch on top of the “main” branch.

Rebase does not create new merge commits as merge does; instead, it modifies the existing commits of the “feat-2” branch. This results in a cleaner commit history.
However, the rebase command should be done with caution, particularly when other team members are actively using the same branch, such as the “feat-2” branch. If you rebase your “feat-2” branch while others are also working on it, it can lead to inconsistencies in the branch history. Git may face difficulties when attempting to synchronize these divergent branches.

If you’re new to Git and prioritize simplicity over maintaining a clean history, use the merge approach as the default option as it is generally easier to understand and use compared to rebase.
Revert Back to the Previous Commit
Imagine this: After creating new commits, you realized that errors have been made within them and want to revert back to a specific commit. How do you do that?
Start with identifying the commit hash of the specific commit you want to revert by running:
git log
commit 0b9bee172936b45c3007b6bf6fa387ac51bdeb8c
    commit-2
commit 992601c3fb66bf1a39cec566bb88a832305d705f
    commit-1
Let’s assume you want to revert back to “commit-1”, you can either use git revert or use git reset.
git revert creates a new commit that undoes the changes made after a specified commit.
git revert <commit-hash>

git reset modifies the commit history by changing the branch pointer to the specified commit.

While git reset keeps the commit history clean, it is more destructive since it discards commits. git revert is a safer option as it leaves the original commits intact.
Good Practices
Ignore Large and Private Files
In a Git repository, it’s essential to exclude specific files or directories from version control to address issues like large file sizes and privacy concerns.
In a data science project, there are certain files you should ignore, such as datasets and secrets, for the following reasons:
- Datasets: Versioning binary datasets can significantly increase the repository’s size.
- Secrets: Data science projects often require credentials or API keys for accessing external services. Including these secrets in the codebase can pose a security risk if the repository is compromised or publicly shared.
To exclude specific files or directories, you can add them to the .gitignore file located in the root directory of your project. Here are some examples:
# .gitignore
data/
.env
Additionally, you should ignore non-essential files that can contribute to large file sizes or are specific to your development environment, such as dependency management files like “venv” or editor-specific files like “.vscode”.
Find a list of useful .gitignore templates for your language here.
Have Small Commits
Break down your changes into small, focused commits. This approach ensures that each commit has a clear purpose, making it easier to understand, revert changes if needed, and minimizes the chances of conflicts.

Have a Descriptive Branch name
Opt for descriptive branch names that accurately reflect the task or feature you’re working on. Avoid vague names like “add file” or personal identifiers like “khuyen-branch.” Instead, choose more descriptive names such as “change-linear-model-to-tree-model” or “encode-categorical-columns.”
Standardize Code Format for Easier Code Review
Consistent code formatting helps reviewers focus on the logic of the code rather than formatting inconsistencies.
In the example code snippet below, it is challenging for reviewers to pinpoint the addition of the print statement due to irregular indentation, spacing, and quotation marks.

Standardizing the code increases code readability.

My favorite tools to format and standardize code are:
- Ruff: An extremely fast Python linter, written in Rust.
- black: A Python code formatter that automatically reformats your code.
Tools to Complement Git
pre-commit
Maintaining consistent code style according to style guides before every commit can be overwhelming. pre-commit automates this process by checking and reformatting your code prior to committing it. Here’s an example of how it works:
$ git commit -m 'my commit'
ruff.......................................Failed
- hook id: ruff
- exit code: 1
Found 3 errors (3 fixed, 0 remaining).
black....................................Failed
- hook id: black
- files were modified by this hook
reformatted src/process.py
All done! ✨ 🍰 ✨
1 file reformatted.
DVC
DVC (Data Version Control) is a system for data version control. It is essentially like Git but is used for data. DVC allows you to store your original data in a separate location while keeping track of different versions of the data in Git.

Conclusion
By adopting Git and leveraging its features along with these complementary tools, you can increase your productivity, maintain code quality, and efficiently collaborate with your teammates.
📚 Want to go deeper? Learning new techniques is the easy part. Knowing how to structure, test, and deploy them is what separates side projects from real work. My book shows you how to build data science projects that actually make it to production. Get the book →
Stay Current with CodeCut
Easy-to-digest articles on Python, AI, and open-source tools. Delivered twice a week.