Generic selectors
Exact matches only
Search in title
Search in content
Post Type Selectors
Filter by Categories
About Article
Analyze Data
Archive
Best Practices
Better Outputs
Blog
Code Optimization
Code Quality
Command Line
Daily tips
Dashboard
Data Analysis & Manipulation
Data Engineer
Data Visualization
DataFrame
Delta Lake
DevOps
DuckDB
Environment Management
Feature Engineer
Git
Jupyter Notebook
LLM
LLM Tools
Machine Learning
Machine Learning & AI
Machine Learning Tools
Manage Data
MLOps
Natural Language Processing
NumPy
Pandas
Polars
PySpark
Python Helpers
Python Tips
Python Utilities
Scrape Data
SQL
Testing
Time Series
Tools
Visualization
Visualization & Reporting
Workflow & Automation
Workflow Automation

Git

Managing Shared Data Science Code with Git Submodules

Table of Contents

What Are Git Submodules?
Using Git Submodules in Practice
Team Collaboration
Managing Submodules Through VS Code
Submodules vs Python Packaging
Conclusion

Data science teams often develop reusable code for preprocessing, feature engineering, and model utilities that multiple projects need to share. Without proper management, these shared dependencies become a source of inconsistency and wasted effort.
Consider a fintech company with three ML teams in separate repositories due to different security clearances and deployment pipelines:

Fraud Detection repo: High-security environment, quarterly releases
Credit Scoring repo: Regulatory compliance, monthly releases
Trading Algorithm repo: Real-time trading, daily releases

All three teams need the same calculate_risk_score() utility, but they can’t merge repositories due to security policies and different release cycles. Copying the utility creates version drift:
Week 1: All teams copy the same utility
Fraud Detection: calculate_risk_score() v1.0
Credit Scoring: calculate_risk_score() v1.0
Trading Algorithm: calculate_risk_score() v1.0

Week 3: Trading team fixes a critical bug but others don't know
Fraud Detection: calculate_risk_score() v1.0 (✗ still broken)
Credit Scoring: calculate_risk_score() v1.0 (✗ still broken)
Trading Algorithm: calculate_risk_score() v1.1 (✓ bug fixed)

Week 5: Each team has different versions
Fraud Detection: calculate_risk_score() v1.2 (≠ different optimization)
Credit Scoring: calculate_risk_score() v1.0 (✗ original broken version)
Trading Algorithm: calculate_risk_score() v1.3 (≠ completely different approach)

Git submodules provide the solution to this version drift problem.
What Are Git Submodules?
Git submodules let you embed one Git repository inside another as a subdirectory. Instead of copying code between projects, you reference a specific commit from a shared repository, ensuring all projects use identical code versions.
your-project/
├── main.py
└── shared-utils/ # ← Git submodule
└── features.py

This ensures every team member gets the same shared code version, preventing the version drift shown in the example above.
For comprehensive Git fundamentals and production-ready workflows that complement Git submodule techniques, check out Production-Ready Data Science.
Using Git Submodules in Practice
Consider our fintech company with fraud detection, credit scoring, and trading projects that all need shared ML utilities for risk calculation and feature engineering.
The shared ml-utils repository contains common ML functions:
ml-utils/
├── __init__.py
├── features.py
└── README.md

# features.py
def calculate_risk_score(data):
return data['income'] / max(data['debt'], 1)

def extract_time_features(df, time_col):
df['hour'] = pd.to_datetime(df[time_col]).dt.hour
df['is_weekend'] = pd.to_datetime(df[time_col]).dt.dayofweek.isin([5, 6])

return df

def calculate_velocity(df, user_col, time_col):
df = df.copy()
df['transaction_count_1h'] = df.groupby(user_col)[time_col].transform('count')

return df

Imagine your fraud detection project looks like this:
fraud-detection/
├── main.py
└── README.md

To add the shared utilities to your fraud detection project, you can run:
git submodule add https://github.com/khuyentran1401/ml-utils.git ml-utils

This will transform the structure of your project to:
fraud-detection/
├── main.py
├── README.md
├── .gitmodules
└── ml-utils/ # ← Submodule directory
├── features.py # Shared ML functions
├── __init__.py
└── README.md

The .gitmodules file tracks the submodule configuration:
[submodule "ml-utils"]
path = ml-utils
url = https://github.com/khuyentran1401/ml-utils.git

Now you can use the shared utilities in your fraud detection pipeline:
# fraud_detection/train_model.py
from ml_utils.features import extract_time_features, calculate_velocity

def prepare_fraud_features(transactions_df):
# Extract time-based features for fraud detection
df = extract_time_features(transactions_df, 'transaction_time')

# Calculate transaction velocity features
df = calculate_velocity(df, 'user_id', 'transaction_time')

return df

# Fraud detection model uses consistent utilities
fraud_features = prepare_fraud_features(raw_transactions)

Team Collaboration
When a new team member joins the fraud detection team, they get the complete setup including shared ML utilities:
# Clone the fraud detection project with all ML utilities
git clone –recurse-submodules https://github.com/khuyentran1401/fraud-detection.git
cd fraud-detection

Alternatively, initialize submodules after cloning:
git clone https://github.com/khuyentran1401/fraud-detection.git
cd fraud-detection
git submodule update –init –recursive

When the code of the shared utilities is updated, you can update the submodule to the latest version:
# Update to latest ML utilities
git submodule update –remote ml-utils

This updates your local copy but doesn’t record which version your project uses. Commit this change so teammates get the same utilities version:
# Commit the submodule update
git add ml-utils
git commit -m "Update ML utilities: improved risk calculation accuracy"

For comprehensive version control of both code and data in ML projects, see our DVC guide.
Managing Submodules Through VS Code
To simplify the process of managing submodules, you can use VS Code’s Source Control panel.
To manage submodules through VS Code’s Source Control panel:

Open your main project folder in VS Code
Navigate to Source Control panel (Ctrl+Shift+G)
You’ll see separate sections for main project and each submodule
Stage and commit changes in the submodule first
Then commit the submodule update in the main project

The screenshot shows VS Code’s independent submodule management:

ml-utils submodule (top): Has staged changes ready to commit with its own message
fraud-detection main project (bottom): Shows submodule as changed, waits for submodule commit

Submodules vs Python Packaging
Python packaging lets you distribute shared utilities as installable packages:
pip install company-ml-utils==1.2.3

This works well for stable libraries with infrequent changes. However, for internal ML utilities that evolve rapidly, packaging creates bottlenecks:

Requires build/publish workflow for every change
Slower iteration during active development
Package contents are hidden – can’t debug into utility functions
Stuck with released versions – can’t access latest bug fixes until next release

Git submodules work differently by making the source code directly accessible in your project for immediate access, full debugging visibility, and precise version control.
Conclusion
Git submodules provide an effective solution for managing shared ML code across data science projects, enabling source-level access while maintaining reproducible workflows.
Use submodules when you need direct access to shared utility source code, frequent iterations on internal libraries, or full control over dependency versions. For stable, external dependencies, traditional Python packaging remains the better choice.
Favorite

Managing Shared Data Science Code with Git Submodules Read More »

Leverage Mermaid for Real-Time Git Graph Rendering

The Git graph helps developers visualize and understand the flow of Git operations, making it easier to discuss and share Git branching strategies.

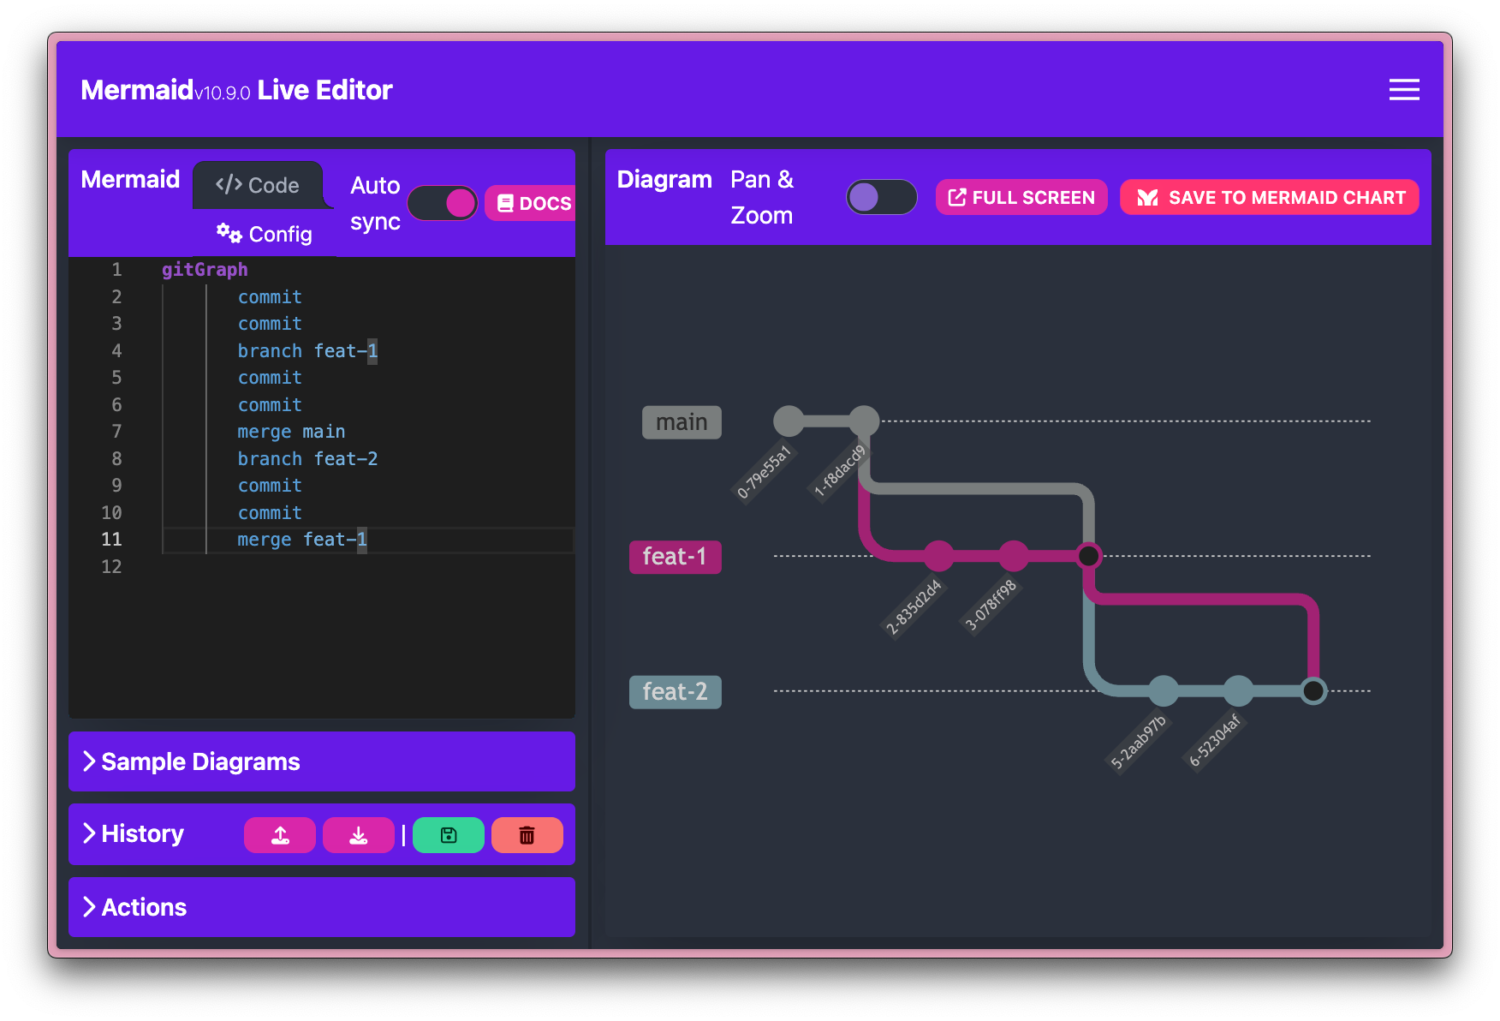
Mermaid enables real-time rendering of the Git graph through commands like merge, checkout, branch, and commit.

Example:

gitGraph
commit
commit
branch feat-1
commit
commit
checkout main
branch feat-2
commit
commit
merge feat-1

In this example, we start by creating two commits on the main branch. We then create a new branch feat-1 and make two commits on it. Next, we switch back to the main branch and create a new branch feat-2, making two commits on it. Finally, we merge the feat-1 branch into main.

The resulting graph shows the flow of these operations, with each branch and commit represented by a node. The merge command creates a new node that combines the changes from both branches.

Learn more about Gitgraph in Mermaid.
Favorite

Leverage Mermaid for Real-Time Git Graph Rendering Read More »

Git Integration Tactics: Merge vs Rebase Explained

When integrating changes from one branch into another, Git offers two primary methods: merge and rebase. Each has its strengths and use cases.

Git Merge: Preserving History

Git merge is the more traditional and straightforward approach. When you merge one branch into another, Git creates a new “merge commit” that combines the changes from both branches.

Merge is particularly useful when you want to record when and how different lines of development came together. It’s also the safer option when working with shared branches, as it doesn’t alter existing commit history.

Git Rebase: Streamlining History

On the other hand, Git rebase takes a different approach. When you rebase a feature branch onto the main branch, Git effectively moves the entire feature branch to begin on the tip of the main branch.

Rebase is particularly valuable when you want to maintain a clean, linear history.

Key Differences and When to Use Each

The primary distinction between merge and rebase lies in how they handle history. Merge preserves it, while rebase rewrites it. This fundamental difference leads to different use cases:

Use merge when working with shared branches or when you want to preserve the context of when and how changes were integrated.

Opt for rebase when working on local branches or when you want to maintain a clean, linear history.

In practice, many teams use a combination of both strategies. They might use rebase to keep feature branches up-to-date with the latest changes from the main branch, and then use merge when it’s time to integrate the completed feature.
Favorite

Git Integration Tactics: Merge vs Rebase Explained Read More »

Git Stash and Pop: Essential Tools for Managing Work in Progress

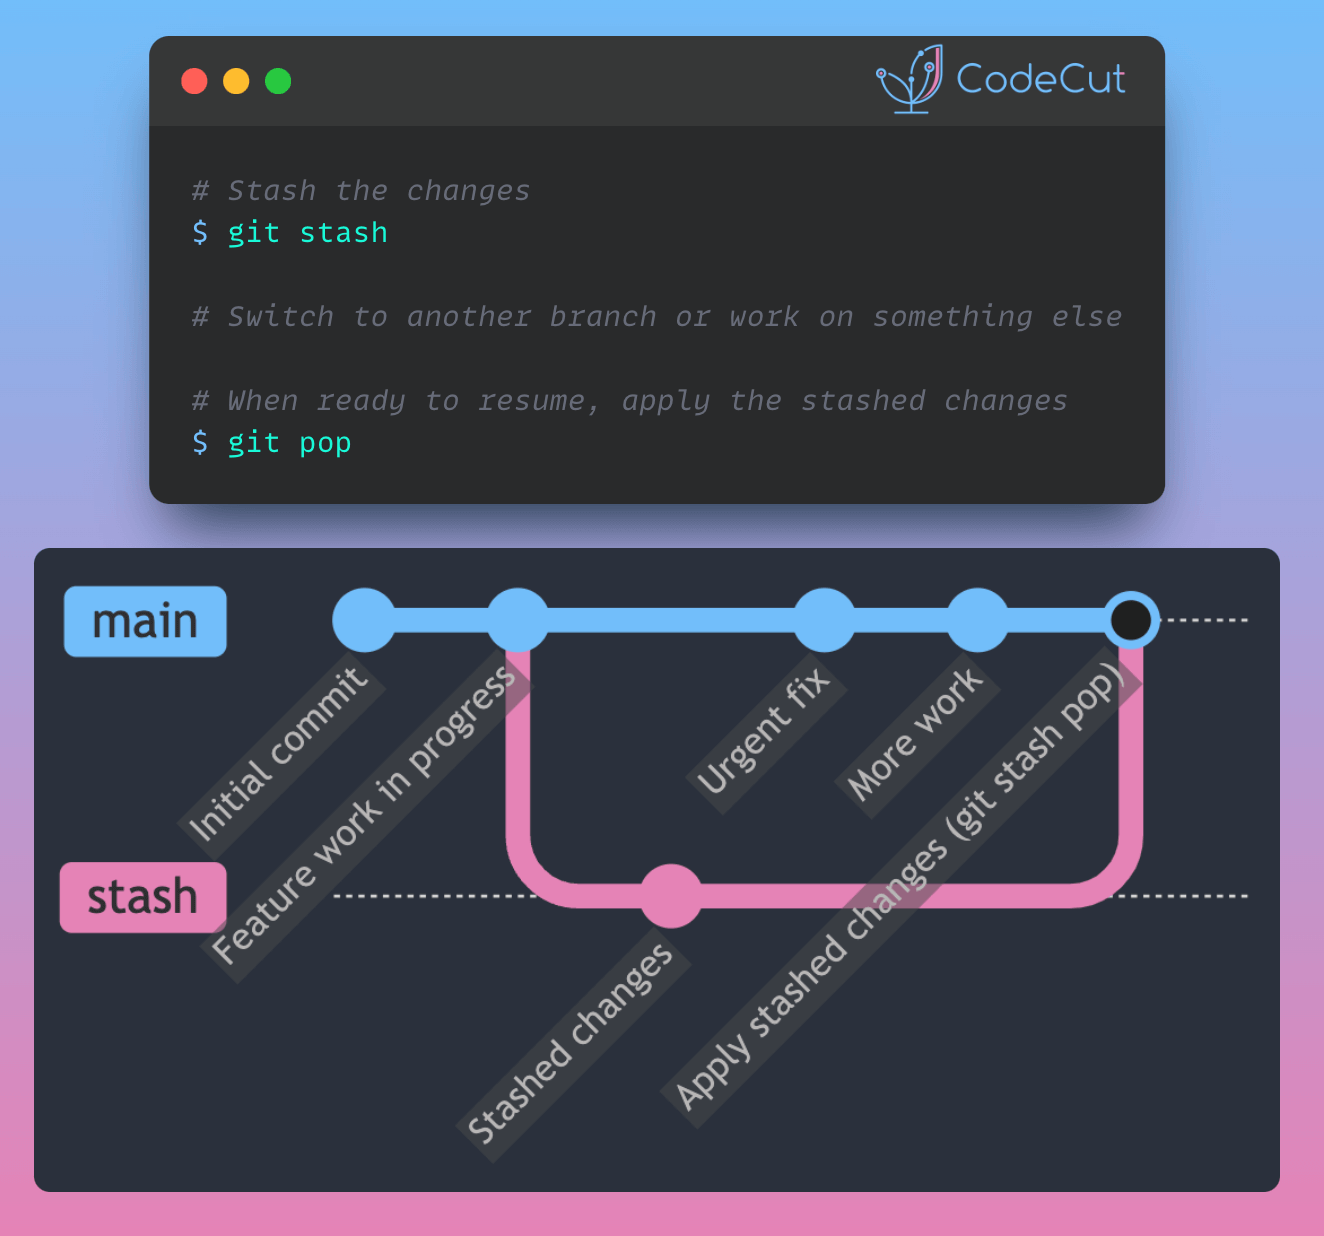
Git’s stash and pop commands provide a convenient way to temporarily store uncommitted changes and reapply them later. This allows for easy context switching without losing work or creating unnecessary commits.

Consider this common scenario in a data science project:

# Working on improving a linear regression model
git checkout -b improved-model

# Editing model.py with new improvements

# Urgent: Critical bug discovered in data loading function
git stash save "WIP: Improving linear regression model"

# Switch to main branch to fix the bug
git checkout main

# Fix the bug in data_loader.py
git add data_loader.py
git commit -m "Fix critical bug in data loading"

# Return to model improvement
git checkout improved-model
git stash pop

# Continue enhancing the model
git add model.py
git commit -m "Complete improved model with scaling"

In this workflow:

git stash save temporarily stores your uncommitted model improvements with a descriptive message.

You switch to the main branch with a clean working directory to address the critical bug.

After fixing the bug, git checkout improved-model returns you to your feature branch.

git stash pop retrieves your saved changes, allowing you to resume work on the model.

This approach helps maintain a clean, organized development process while providing the flexibility to address urgent issues without losing progress on ongoing tasks.
Favorite

Git Stash and Pop: Essential Tools for Managing Work in Progress Read More »

Git Basics for Data Scientists

Git is a version control system that allows you to track changes made to your codebase over time. It’s an essential tool for developers, as it enables you to:

Keep track of changes made to your codebase

Collaborate with others on coding projects

Version control your codebase

Roll-back changes if something goes wrong

Here are some basic Git commands to get you started:

Initialize a new Git repository: git init

Check the status of your repository: git status

Create a new branch: git branch <branch-name>

Make changes to your codebase: git add <file-name>

Commit your changes: git commit -m "<commit-message>"

Push your changes to a remote repository: git push

For a full guide on Git for data scientists, view my article.

Favorite

Git Basics for Data Scientists Read More »

Streamline Code Reviews with CodeRabbit

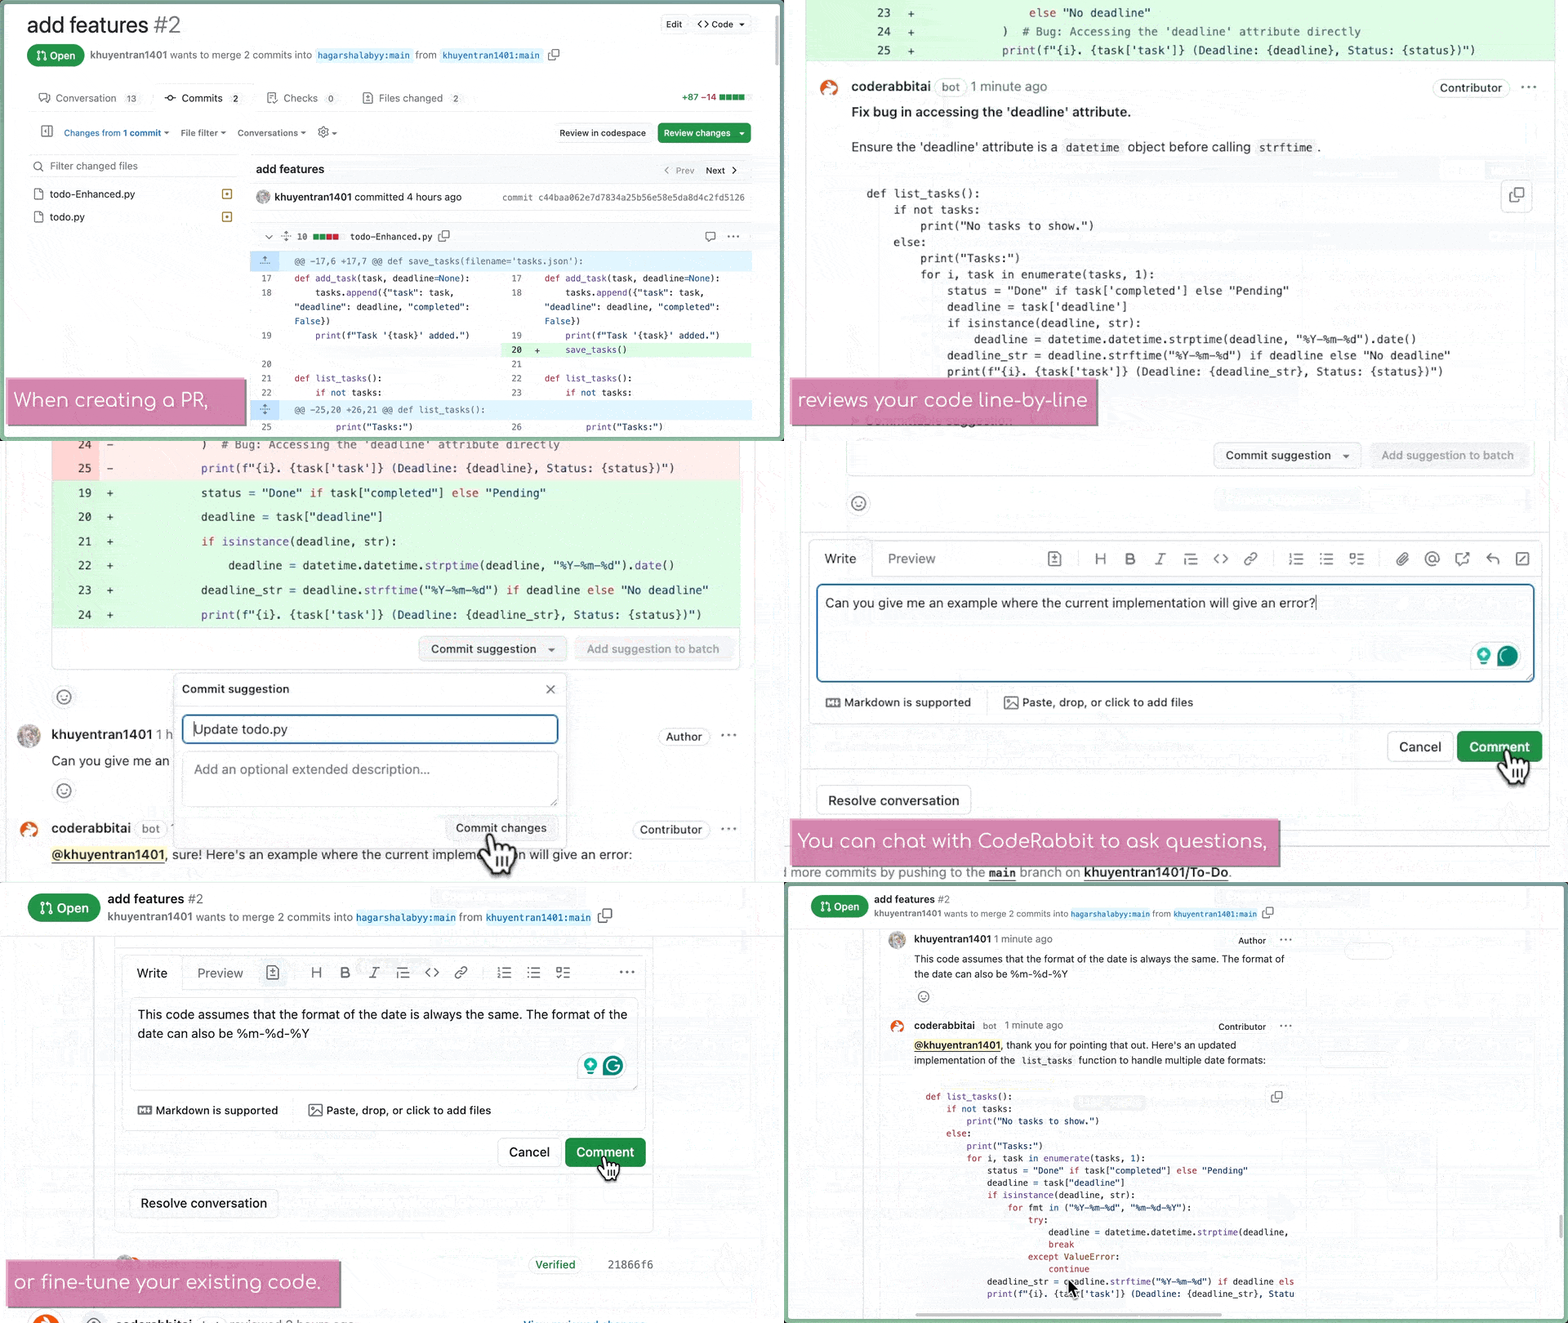
Code reviewing is crucial, but it can be tedious and error-prone when done manually. CodeRabbit, an AI-powered code review assistant, can speed up the process and minimize the chance of missing bugs.

Key Features:

Quick and detailed pull request summaries

Line-by-line analysis to spot issues and improvement opportunities

Quickly address problems with a single click

Real-time support for questions, code generation, and fine-tuning.

Link to CodeRabbit.

View the PR.
Favorite

Streamline Code Reviews with CodeRabbit Read More »

Streamlining Code Review with Sourcery

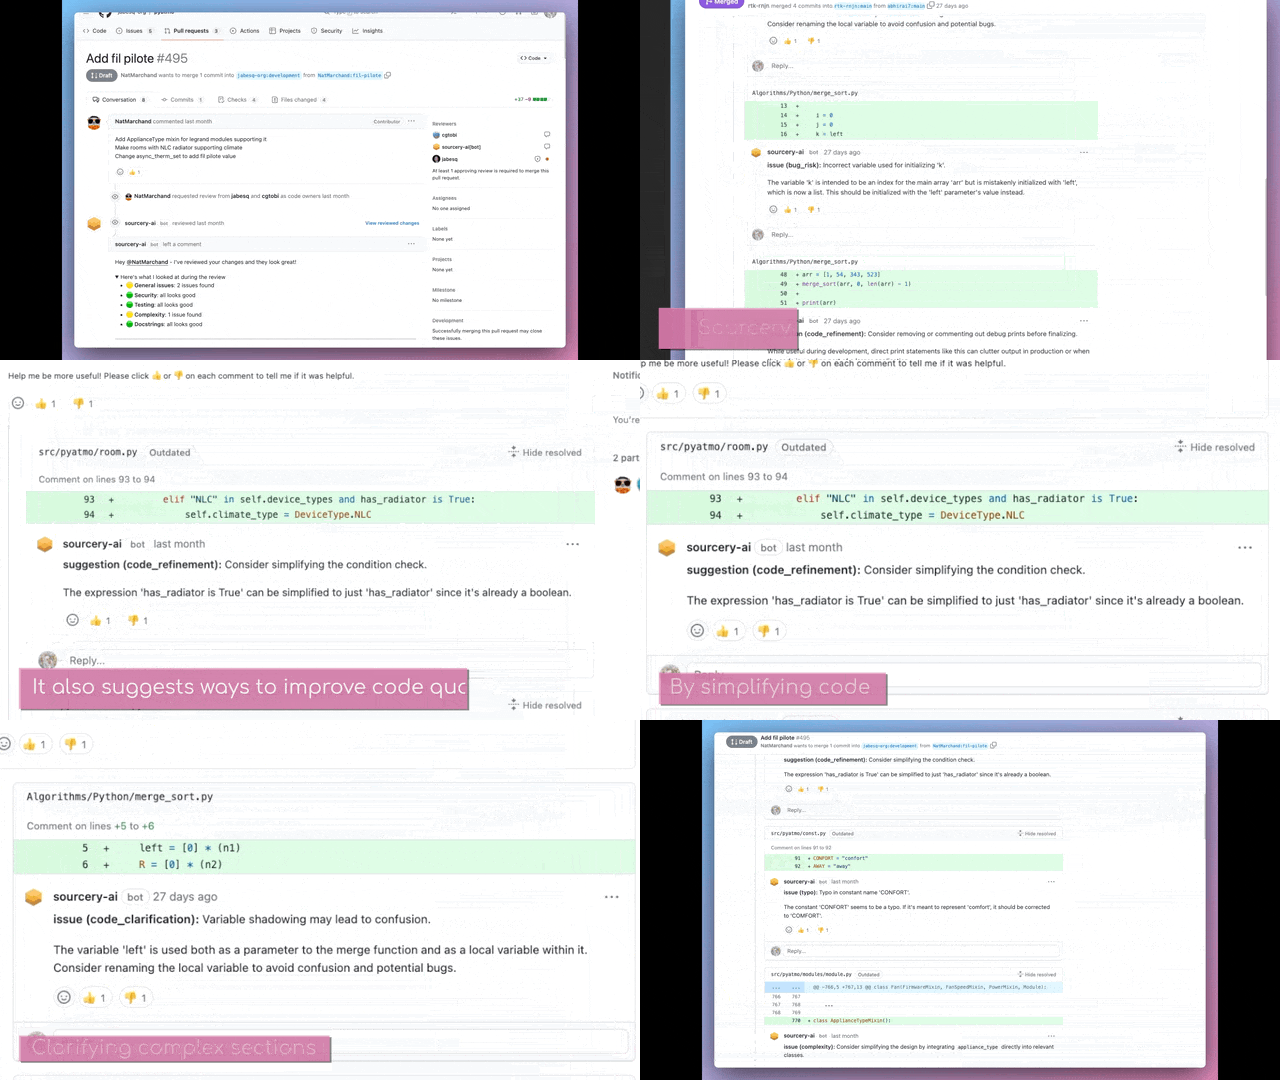
Manually reviewing code changes in pull requests (PRs) can be time-consuming and error-prone, especially in large projects or teams. Sourcery can streamline this process by automatically handling the review process.

After submitting a PR, Sourcery quickly reviews the code, checking for bugs and code quality, allowing developers to focus on more complex tasks.

Link to Sourcery.
Favorite

Streamlining Code Review with Sourcery Read More »

nbstripout: Efficiently Managing Notebook Outputs in Git

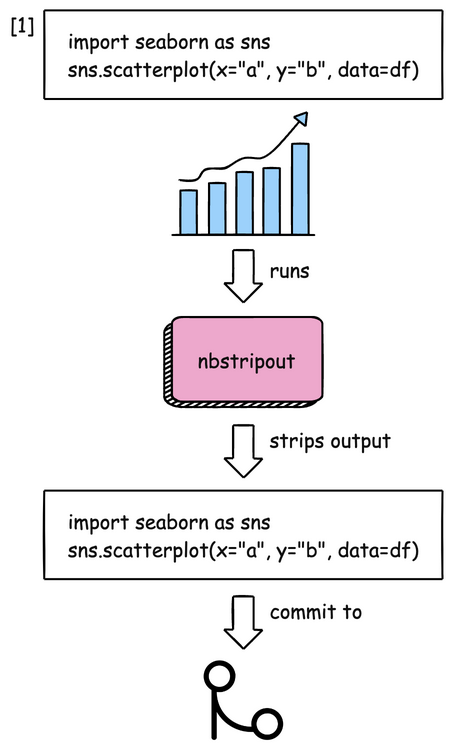
Committing notebooks with outputs to Git can cause repository bloat and slow down cloning, pulling, and pushing. To address this issue, it’s best to remove notebook outputs before committing them to Git.

However, remembering to do this manually can be difficult. By integrating nbstripout with pre-commit, you can automatically strip out notebook outputs before committing, making the process simpler and more efficient.

Link to nbstripout.
Favorite

nbstripout: Efficiently Managing Notebook Outputs in Git Read More »

Enhance Jupyter Notebook Collaboration on GitHub with ReviewNB

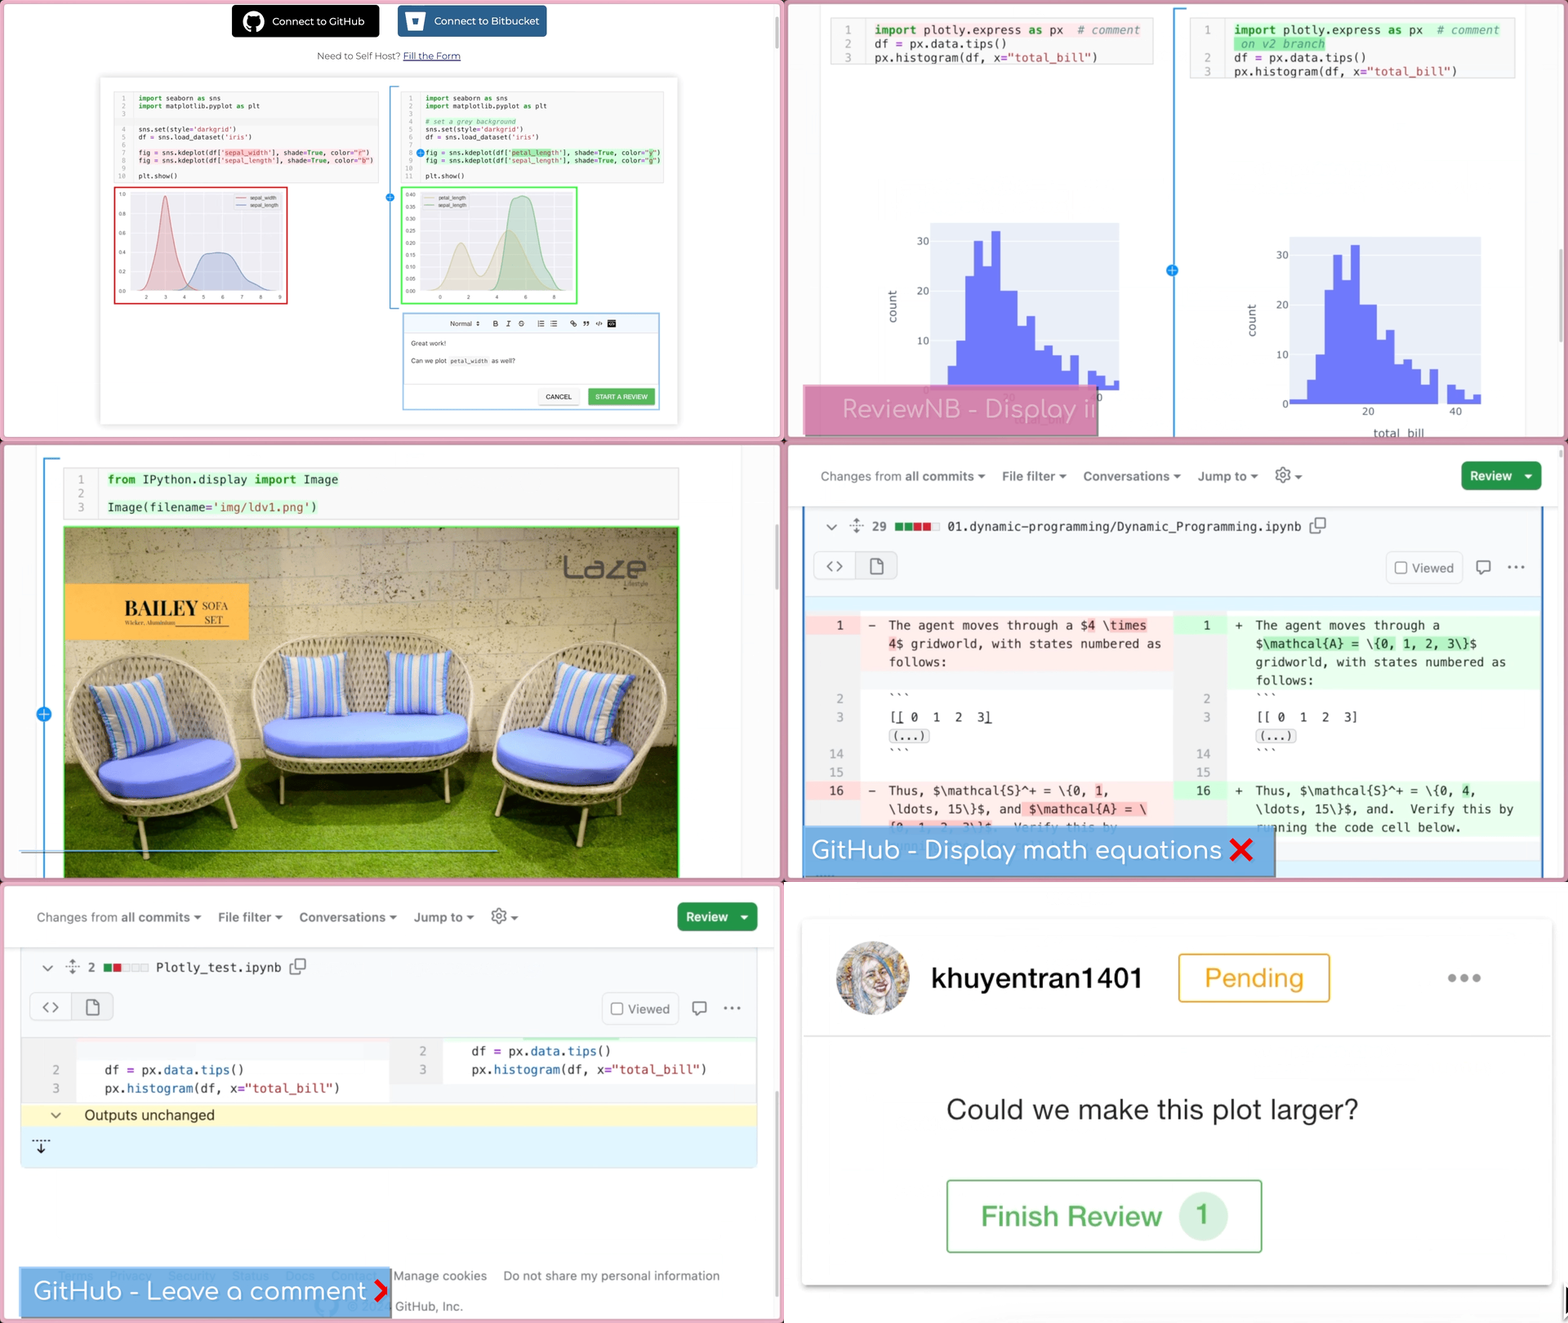
The Jupyter Notebooks interface on GitHub has limitations, including the inability to display plots, mathematical expressions, and open large notebooks.

The integration of ReviewNB with GitHub overcomes all these limitations, providing a more robust solution for collaborating on notebook changes.

Link to ReviewNB.
Favorite

Enhance Jupyter Notebook Collaboration on GitHub with ReviewNB Read More »

0
    0
    Your Cart
    Your cart is empty
    Scroll to Top

    Work with Khuyen Tran

    Work with Khuyen Tran