Table of Contents
Introduction
The Test Document
Docling: TableFormer Deep Learning
Marker: Vision Transformer Pipeline
LlamaParse: LLM-Guided Extraction
Summary
Try It Yourself
Introduction
Have you ever copied a table from a PDF into a spreadsheet only to find the formatting completely broken? These issues include cells shifting, values landing in the wrong columns, and merged headers losing their structure.
This happens because PDFs do not store tables as structured data. They simply place text at specific coordinates on a page.
For example, a table that looks like this on screen:
┌───────┬───────┐
│ Name │ Score │
├───────┼───────┤
│ Alice │ 92 │
│ Bob │ 85 │
└───────┴───────┘
is stored in the PDF as a flat list of positioned text:
"Name" at (x=72, y=710)
"Score" at (x=200, y=710)
"Alice" at (x=72, y=690)
"92" at (x=200, y=690)
"Bob" at (x=72, y=670)
"85" at (x=200, y=670)
A table extraction tool must analyze those positions, determine which text belongs in each cell, and rebuild the table structure.
The challenge becomes even greater with multi-level headers, merged cells, or tables that span multiple pages. Many tools struggle with at least one of these scenarios.
While doing research, I came across three Python tools for extracting tables from PDFs: Docling, Marker, and LlamaParse. To compare them fairly, I ran each tool on the same PDF and evaluated the results.
In this article, I’ll walk through what I found and help you decide which tool may work best for your needs.
💻 Get the Code: The complete source code and Jupyter notebook for this tutorial are available on GitHub. Clone it to follow along!
Stay Current with CodeCut
Actionable Python tips, curated for busy data pros. Skim in under 2 minutes, three times a week.
.codecut-subscribe-form .codecut-input {
background: #2F2D2E !important;
border: 1px solid #72BEFA !important;
color: #FFFFFF !important;
}
.codecut-subscribe-form .codecut-input::placeholder {
color: #999999 !important;
}
.codecut-subscribe-form .codecut-subscribe-btn {
background: #72BEFA !important;
color: #2F2D2E !important;
}
.codecut-subscribe-form .codecut-subscribe-btn:hover {
background: #5aa8e8 !important;
}
.codecut-subscribe-form {
max-width: 650px;
display: flex;
flex-direction: column;
gap: 8px;
}
.codecut-input {
-webkit-appearance: none;
-moz-appearance: none;
appearance: none;
background: #FFFFFF;
border-radius: 8px !important;
padding: 8px 12px;
font-family: ‘Comfortaa’, sans-serif !important;
font-size: 14px !important;
color: #333333;
border: none !important;
outline: none;
width: 100%;
box-sizing: border-box;
}
input[type=”email”].codecut-input {
border-radius: 8px !important;
}
.codecut-input::placeholder {
color: #666666;
}
.codecut-email-row {
display: flex;
align-items: stretch;
height: 36px;
gap: 8px;
}
.codecut-email-row .codecut-input {
flex: 1;
}
.codecut-subscribe-btn {
background: #72BEFA;
color: #2F2D2E;
border: none;
border-radius: 8px;
padding: 8px 14px;
font-family: ‘Comfortaa’, sans-serif;
font-size: 14px;
font-weight: 500;
cursor: pointer;
text-decoration: none;
display: flex;
align-items: center;
justify-content: center;
transition: background 0.3s ease;
}
.codecut-subscribe-btn:hover {
background: #5aa8e8;
}
.codecut-subscribe-btn:disabled {
background: #999;
cursor: not-allowed;
}
.codecut-message {
font-family: ‘Comfortaa’, sans-serif;
font-size: 12px;
padding: 8px;
border-radius: 6px;
display: none;
}
.codecut-message.success {
background: #d4edda;
color: #155724;
display: block;
}
/* Mobile responsive */
@media (max-width: 480px) {
.codecut-email-row {
flex-direction: column;
height: auto;
gap: 8px;
}
.codecut-input {
border-radius: 8px;
height: 36px;
}
.codecut-subscribe-btn {
width: 100%;
text-align: center;
border-radius: 8px;
height: 36px;
}
}
Subscribe
The Test Document
All examples use the same PDF: the Docling Technical Report from arXiv. This paper contains tables with the features that make extraction difficult:
Multi-level headers with sub-columns
Merged cells spanning multiple rows
Numeric data that is easy to misalign
source = "https://arxiv.org/pdf/2408.09869"
Some tools require a local file path instead of a URL, so let’s download the PDF first:
import urllib.request
# Download PDF locally (used by Marker later)
local_pdf = "docling_report.pdf"
urllib.request.urlretrieve(source, local_pdf)
Docling: TableFormer Deep Learning
Docling is IBM’s open-source document converter built specifically for structured extraction. Its table pipeline works in two steps:
Detect table regions using a layout analysis model that finds tables, text, and figures on each page
Reconstruct cell structure using TableFormer, a deep learning model that maps each cell to its row and column position
Here is what that looks like in practice:
PDF page with mixed content
┌─────────────────────┐
│ Text paragraph… │
│ Name Score │
│ Alice 92 │
│ Bob 85 │
│ (figure) │
└─────────────────────┘
│
▼
Step 1: Layout model detects table region
┌─────────────────────┐
│ ┌─────────────────┐ │
│ │ Name Score │ │
│ │ Alice 92 │ │
│ │ Bob 85 │ │
│ └─────────────────┘ │
└─────────────────────┘
│
▼
Step 2: TableFormer maps cells to rows and columns
┌───────┬───────┐
│ Name │ Score │
├───────┼───────┤
│ Alice │ 92 │
│ Bob │ 85 │
└───────┴───────┘
The result is a pandas DataFrame for each table, ready for analysis.
For Docling’s full document processing capabilities beyond tables, including chunking and RAG integration, see Transform Any PDF into Searchable AI Data with Docling.
To install Docling, run:
pip install docling
This article uses docling v2.63.0.
Table Extraction
To extract tables from the PDF, we need to first convert it to a Docling document using DocumentConverter:
from docling.document_converter import DocumentConverter
# Convert PDF
converter = DocumentConverter()
result = converter.convert(source)
Once we have the Docling document, we can loop through all detected tables and export each one as a pandas DataFrame:
for i, table in enumerate(result.document.tables):
df = table.export_to_dataframe(doc=result.document)
print(f"Table {i + 1}: {df.shape[0]} rows × {df.shape[1]} columns")
Table 1: 2 rows × 8 columns
Table 2: 1 rows × 5 columns
Table 3: 0 rows × 0 columns
The PDF contains 5 tables, but Docling only detected 3.
Table 3 returned 0 rows. This means the layout model flagged it as a table but TableFormer couldn’t extract any structure from it.
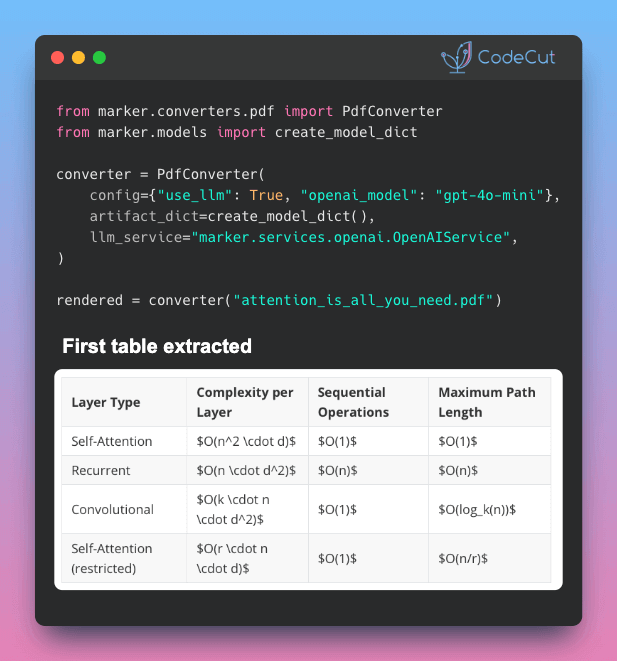
Let’s look at the first table. Here’s the original from the PDF:
And here’s what Docling extracted:
# Export the first table as a DataFrame
table_1 = result.document.tables[0]
df_1 = table_1.export_to_dataframe(doc=result.document)
df_1
CPU
Thread budget
native TTS
native Pages/s
native Mem
pypdfium TTS
pypdfium Pages/s
pypdfium Mem
Apple M3 Max (16 cores)
4 16
177 s 167 s
1.27 1.34
6.20 GB
103 s 92 s
2.18 2.45
2.56 GB
Intel(R) Xeon E5-2690
4 16
375 s 244 s
0.60 0.92
6.16 GB
239 s 143 s
0.94 1.57
2.42 GB
Notice how Docling handles this complex table:
Docling smartly handled the multi-level header by flattening it into separate columns (“native backend” → “native TTS”, “native Pages/s”, “native Mem”).
However, it merged each CPU’s two thread-budget rows into one, packing values like “177 s 167 s” into single cells.
Now the second table. Here’s the original from the PDF:
And here’s what Docling extracted:
# Export the second table as a DataFrame
table_2 = result.document.tables[1]
df_2 = table_2.export_to_dataframe(doc=result.document)
df_2
human
MRCNN R50 R101
FRCNN R101
YOLO v5x6
0
Caption Footnote Formula List-item Page-footer…
84-89 83-91 83-85 87-88 93-94 85-89 69-71 83-8…
68.4 71.5 70.9 71.8 60.1 63.4 81.2 80.8 61.6 5…
70.1 73.7 63.5 81.0 58.9 72.0 72.0 68.4 82.2 8…
We can see that Docling did not handle this table as well as the first one:
Docling merged the MRCNN sub-columns (R50, R101) into a single “MRCNN R50 R101” column instead of two separate ones.
All 13 rows were collapsed into one, concatenating values like “68.4 71.5 70.9…” into a single cell.
Complex tables with multi-level headers and merged cells remain a challenge for Docling’s table extraction.
Performance
Docling took about 28 seconds for the full 6-page PDF on an Apple M1 (16 GB RAM), thanks to its lightweight two-stage pipeline.
Marker: Vision Transformer Pipeline
Marker is an open-source PDF-to-Markdown converter built on the Surya layout engine. Unlike Docling’s two-stage pipeline, Marker runs five stages for table extraction:
Layout detection: a Vision Transformer identifies table regions on each page
OCR error detection: flags misrecognized text
Bounding box detection: locates individual cell boundaries
Table recognition: reconstructs row/column structure from detected cells
Text recognition: extracts text from all detected regions
Here is how the five stages work together:
PDF page
┌─────────────────────┐
│ Text paragraph… │
│ Name Score │
│ Alice 92 │
│ Bob 85 │
└─────────────────────┘
│
▼
1. Layout detection → finds [TABLE] region
2. OCR error detection → fixes misread text
│
▼
3. Bounding box detection
┌──────────────────┐
│ [Name] [Score] │
│ [Alice] [92] │
│ [Bob] [85] │
└──────────────────┘
│
▼
4. Table recognition → maps cells to rows/columns
5. Text recognition → extracts final text
│
▼
| Name | Score |
|——-|——-|
| Alice | 92 |
| Bob | 85 |
To install Marker, run:
pip install marker-pdf
Table Extraction
Marker provides a dedicated TableConverter that extracts only tables from a document, returning them as Markdown:
from marker.converters.table import TableConverter
from marker.models import create_model_dict
from marker.output import text_from_rendered
models = create_model_dict()
converter = TableConverter(artifact_dict=models)
rendered = converter(local_pdf)
table_md, _, images = text_from_rendered(rendered)
Since TableConverter returns all tables as a single Markdown string, we split them on blank lines:
tables = table_md.strip().split("\n\n")
print(f"Tables found: {len(tables)}")
Tables found: 3
Let’s look at the first table. Here’s the original from the PDF:
And here’s what Marker extracted:
print(tables[0].md)
CPU
Thread
native backend
pypdfium backend
budget
TTS
Pages/s
Mem
TTS
Pages/s
Mem
Apple M3 Max<br>(16 cores)
4<br>16
177 s<br>167 s
1.27<br>1.34
6.20 GB
103 s<br>92 s
2.18<br>2.45
2.56 GB
Intel(R) Xeon<br>E5-2690<br>(16 cores)
4<br>16
375 s<br>244 s
0.60<br>0.92
6.16 GB
239 s<br>143 s
0.94<br>1.57
2.42 GB
Marker preserves the original table format well:
While Docling flattened this into prefixed column names like “native TTS”, Marker preserves the two-tier header (“native backend” → TTS, Pages/s, Mem) as separate rows, keeping the parent header visible.
While Docling packed these into single strings like “177 s 167 s” without separators, Marker preserves the distinction between values by using <br> tags, making it easy to split them programmatically later with a simple string split
Let’s look at the second table. Here’s the original from the PDF:
And here’s what Marker extracted:
print(tables[1].md)
human<br>MRCNN
FRCNN YOLO
R50 R101
R101
v5x6
Caption
84-89 68.4 71.5
70.1
77.7
Footnote
83-91 70.9 71.8
73.7
77.2
Formula
83-85 60.1 63.4
63.5
66.2
List-item
87-88 81.2 80.8
81.0
86.2
Page-footer
93-94 61.6 59.3
58.9
61.1
Page-header
85-89 71.9 70.0
72.0
67.9
Picture
69-71 71.7 72.7
72.0
77.1
Section-header 83-84 67.6 69.3
68.4
74.6
Table
77-81 82.2 82.9
82.2
86.3
Text
84-86 84.6 85.8
85.4
88.1
Title
60-72 76.7 80.4
79.9
82.7
All
82-83 72.4 73.5
73.4
76.8
This table has several column-merging issues:
“human” and “MRCNN” are merged into one header (human<br>MRCNN), and “FRCNN” and “YOLO” are combined into a single header (FRCNN YOLO).
The human, MRCNN R50, and MRCNN R101 values are packed into one cell (“84-89 68.4 71.5”), while the MRCNN R50 and R101 columns are empty.
The R50 and R101 sub-columns collapsed into a single “R50 R101” cell.
Despite these issues, Marker still preserves all 12 rows individually, while Docling collapsed them into one.
Let’s look at the third table. Here’s the original from the PDF:
And here’s what Marker extracted:
print(tables[2].md)
human
MRCNN
MRCNN
FRCNN
YOLO
human
R50
R101
R101
v5x6
Caption
84-89
68.4
71.5
70.1
77.7
Footnote
83-91
70.9
71.8
73.7
77.2
Formula
83-85
60.1
63.4
63.5
66.2
List-item
87-88
81.2
80.8
81.0
86.2
Page-footer
93-94
61.6
59.3
58.9
61.1
Page-header
85-89
71.9
70.0
72.0
67.9
Picture
69-71
71.7
72.7
72.0
77.1
Section-header
83-84
67.6
69.3
68.4
74.6
Table
77-81
82.2
82.9
82.2
86.3
Text
84-86
84.6
85.8
85.4
88.1
Title
60-72
76.7
80.4
79.9
82.7
All
82-83
72.4
73.5
73.4
76.8
Since the layout of this table is simpler, Marker’s vision model correctly separates all columns and preserves all 12 rows. This shows that Marker’s accuracy depends heavily on the visual complexity of the original table.
Performance
TableConverter took about 6 minutes on an Apple M1 (16 GB RAM), roughly 13x slower than Docling. The speed difference comes down to how each tool handles text:
Docling extracts text that is already stored in the PDF, skipping OCR. It only runs its layout model and TableFormer on detected tables.
Marker runs Surya’s full text recognition model on every page, regardless of whether the PDF already contains selectable text.
LlamaParse: LLM-Guided Extraction
LlamaParse is a cloud-hosted document parser by LlamaIndex that takes a different approach:
Cloud-based: the PDF is uploaded to LlamaCloud instead of being processed locally
LLM-guided: an LLM interprets each page and identifies tables, returning structured row data
Here is how it works:
PDF file
┌─────────────────────┐
│ Name Score │
│ Alice 92 │
│ Bob 85 │
└─────────────────────┘
│
▼ upload
┌─────────────────────┐
│ LlamaCloud │
│ │
│ LLM reads the page │
│ and identifies │
│ table structure │
└─────────────────────┘
│
▼ response
┌───────┬───────┐
│ Name │ Score │
├───────┼───────┤
│ Alice │ 92 │
│ Bob │ 85 │
└───────┴───────┘
For extracting structured data from images like receipts using the same LlamaIndex ecosystem, see Turn Receipt Images into Spreadsheets with LlamaIndex.
To install LlamaParse, run:
pip install llama-parse
This article uses llama-parse v0.6.54.
LlamaParse requires an API key from LlamaIndex Cloud. The free tier includes 10,000 credits per month (basic parsing costs 1 credit per page; advanced modes like parse_page_with_agent cost more).
Create a .env file with your API key:
LLAMA_CLOUD_API_KEY=llx-…
from dotenv import load_dotenv
load_dotenv()
Table Extraction
To extract tables, we create a LlamaParse instance with two key settings:
parse_page_with_agent: tells LlamaCloud to use an LLM agent that reads each page and returns structured items (tables, text, figures)
output_tables_as_HTML=True: returns tables as HTML instead of Markdown, which better preserves multi-level headers
from llama_cloud_services import LlamaParse
parser = LlamaParse(
parse_mode="parse_page_with_agent",
output_tables_as_HTML=True,
)
result = parser.parse(local_pdf)
We can then iterate through each page’s items and collect only the tables:
all_tables = []
for page in result.pages:
for item in page.items:
if item.type == "table":
all_tables.append(item)
print(f"Items tagged as table: {len(all_tables)}")
Items tagged as table: 5
Not all items tagged as “table” are actual tables. LlamaParse’s LLM sometimes misidentifies non-table content (like the paper’s title page) as a table. We can filter these out by keeping only tables with more than 2 rows:
tables = [t for t in all_tables if len(t.rows) > 2]
print(f"Actual tables: {len(tables)}")
Actual tables: 4
Let’s look at the first table. Here’s the original from the PDF:
And here’s what LlamaParse extracted:
print(tables[0].md)
CPU
Threadbudget
native backend<br/>TTS
native backend<br/>Pages/s
native backend<br/>Mem
pypdfium backend<br/>TTS
pypdfium backend<br/>Pages/s
pypdfium backend<br/>Mem
Apple M3 Max<br/>(16 cores)
4
177 s
1.27
6.20 GB
103 s
2.18
2.56 GB
16
167 s
1.34
92 s
2.45
Intel(R) Xeon<br/>E5-2690<br/>(16 cores)
4
375 s
0.60
6.16 GB
239 s
0.94
2.42 GB
16
244 s
0.92
143 s
1.57
LlamaParse produces the best result for this table among the three tools:
All values are correctly placed in individual cells. Docling packed multiple values like “177 s 167 s” into single strings, and Marker split multi-line CPU names across extra rows.
Multi-line entries like “Apple M3 Max / (16 cores)” stay in one cell via <br/> tags, avoiding Marker’s row-splitting issue.
The two-tier header is flattened into native backend<br/>TTS rather than kept as separate rows like Marker, but the grouping is still readable.
Let’s look at the second table. Here’s the original from the PDF:
And here’s what LlamaParse extracted:
print(tables[1].md)
human
MRCNN<br/>R50
MRCNN<br/>R101
FRCNN<br/>R101
YOLO<br/>v5x6
Caption
84-89
68.4
71.5
70.1
77.7
Footnote
83-91
70.9
71.8
73.7
77.2
Formula
83-85
60.1
63.4
63.5
66.2
List-item
87-88
81.2
80.8
81.0
86.2
Page-footer
93-94
61.6
59.3
58.9
61.1
Page-header
85-89
71.9
70.0
72.0
67.9
Picture
69-71
71.7
72.7
72.0
77.1
Section-header
83-84
67.6
69.3
68.4
74.6
Table
77-81
82.2
82.9
82.2
86.3
Text
84-86
84.6
85.8
85.4
88.1
Title
60-72
76.7
80.4
79.9
82.7
All
82-83
72.4
73.5
73.4
76.8
LlamaParse produces the most accurate extraction of this table among the three tools:
All 12 data rows are preserved with correct values. Docling merged all rows into a single row.
Each column is correctly separated, while Marker merged some into combined headers like “FRCNN YOLO”.
The MRCNN sub-columns (R50, R101) use <br/> tags to keep the parent header visible (e.g., MRCNN<br/>R50), unlike Marker which lost the grouping entirely.
Let’s look at the third table. Here’s the original from the PDF:
And here’s what LlamaParse extracted:
print(tables[2].md)
human
R50
R100
R101
v5x6
Caption
84-89
68.4
71.5
70.1
77.7
Footnote
83-91
70.9
71.8
73.7
77.2
Formula
83-85
60.1
63.4
63.5
66.2
List-item
87-88
81.2
80.8
81.0
86.2
Page-footer
93-94
61.6
59.3
58.9
61.1
Page-header
85-89
71.9
70.0
72.0
67.9
Picture
69-71
71.7
72.7
72.0
77.1
Section-header
83-84
67.6
69.3
68.4
74.6
Table
77-81
82.2
82.9
82.2
86.3
Text
84-86
84.6
85.8
85.4
88.1
Title
60-72
76.7
80.4
79.9
82.7
The data values are correct but header information is partially lost:
Parent model names (MRCNN, FRCNN, YOLO) are stripped from headers, unlike the previous table which used <br/> tags to preserve them.
“MRCNN R101” appears as “R100” (a typo), and the two R101 columns (MRCNN and FRCNN) are indistinguishable.
Marker handled this table better, keeping all 12 rows with proper column names. Docling missed this table entirely.
Unlike Docling and Marker, LlamaParse actually detects the fourth table. Here’s the original from the PDF:
And here’s what LlamaParse extracted:
print(tables[3].md)
class label
Count
% of TotalTrain
% of TotalTest
% of TotalVal
triple inter-annotator mAP @ 0.5-0.95 (%)<br/>All
triple inter-annotator mAP @ 0.5-0.95 (%)<br/>Fin
triple inter-annotator mAP @ 0.5-0.95 (%)<br/>Man
triple inter-annotator mAP @ 0.5-0.95 (%)<br/>Sci
triple inter-annotator mAP @ 0.5-0.95 (%)<br/>Law
triple inter-annotator mAP @ 0.5-0.95 (%)<br/>Pat
triple inter-annotator mAP @ 0.5-0.95 (%)<br/>Ten
Caption
22524
2.04
1.77
2.32
84-89
40-61
86-92
94-99
95-99
69-78
n/a
Footnote
6318
0.60
0.31
0.58
83-91
n/a
100
62-88
85-94
n/a
82-97
Formula
25027
2.25
1.90
2.96
83-85
n/a
n/a
84-87
86-96
n/a
n/a
List-item
185660
17.19
13.34
15.82
87-88
74-83
90-92
97-97
81-85
75-88
93-95
Page-footer
70878
6.51
5.58
6.00
93-94
88-90
95-96
100
92-97
100
96-98
Page-header
58022
5.10
6.70
5.06
85-89
66-76
90-94
98-100
91-92
97-99
81-86
Picture
45976
4.21
2.78
5.31
69-71
56-59
82-86
69-82
80-95
66-71
59-76
Section-header
142884
12.60
15.77
12.85
83-84
76-81
90-92
94-95
87-94
69-73
78-86
Table
34733
3.20
2.27
3.60
77-81
75-80
83-86
98-99
58-80
79-84
70-85
Text
510377
45.82
49.28
45.00
84-86
81-86
88-93
89-93
87-92
71-79
87-95
Title
5071
0.47
0.30
0.50
60-72
24-63
50-63
94-100
82-96
68-79
24-56
Total
1107470
941123
99816
66531
82-83
71-74
79-81
89-94
86-91
71-76
68-85
LlamaParse correctly extracts all 12 data rows plus the Total row with accurate values:
The two-tier headers are flattened into combined names like “% of TotalTrain”, losing the visual grouping but keeping the association.
The “triple inter-annotator mAP” prefix is repeated for every sub-column (All, Fin, Man, etc.), making headers verbose but unambiguous.
All numeric values and n/a entries match the original.
Performance
LlamaParse finished in 17 seconds, roughly 40% faster than Docling (28s) and 20x faster than Marker (6 min).
This is because LlamaParse offloads the work to LlamaCloud’s servers:
The 17-second runtime depends on network speed and server load, not your local hardware.
Summary
The table below summarizes the key differences we found after testing all three tools on the same PDF:
Feature
Docling
Marker
LlamaParse
Table detection
TableFormer
Vision Transformer
LLM (cloud)
Multi-level headers
Flattens into prefixed names
Keeps as separate rows
Preserves with <br/> tags
Row separation
Concatenates into one cell
Separates with <br> tags
Keeps each value in its own cell
Speed (6-page PDF)
~28s
~6 min
~17s
Dependencies
PyTorch + models
PyTorch + models
API key
Pricing
Free (MIT)
Free (GPL-3.0)
Free tier (10k credits/month)
In short:
Docling is the fastest local option and gives you DataFrames out of the box, but it struggles with complex tables, sometimes merging rows and packing values together.
Marker preserves rows reliably and runs locally, but it is the slowest and can merge column headers on tricky layouts.
LlamaParse produces the most accurate tables overall, but it requires a cloud API and the free tier is limited to 10,000 credits per month.
So which one should you use?
For simple tables, start with Docling. It is free, fast, and produces DataFrames that are immediately ready for analysis.
If you must stay local and Docling struggles with the layout, Marker is the better alternative.
Use LlamaParse when accuracy matters most and your documents aren’t sensitive, since all pages are uploaded to LlamaCloud for processing.
Try It Yourself
These benchmarks are based on a single academic PDF tested on an Apple M1 (16 GB RAM). Table complexity, document length, and hardware all affect the results. The best way to pick the right tool is to run each one on a sample of your own PDFs.
Docling and Marker are completely free, and LlamaParse’s free tier gives you 10,000 credits per month to experiment with.
Related Tutorials
From CSS Selectors to Natural Language: Web Scraping with ScrapeGraphAI: Use LLM-guided web scraping to extract structured data from HTML pages without manual selector maintenance
Structured Output Tools for LLMs Compared: Compare tools for enforcing schemas and structured formats on LLM outputs
📚 Want to go deeper? My book shows you how to build data science projects that actually make it to production. Get the book →
Stay Current with CodeCut
Actionable Python tips, curated for busy data pros. Skim in under 2 minutes, three times a week.
.codecut-subscribe-form .codecut-input {
background: #2F2D2E !important;
border: 1px solid #72BEFA !important;
color: #FFFFFF !important;
}
.codecut-subscribe-form .codecut-input::placeholder {
color: #999999 !important;
}
.codecut-subscribe-form .codecut-subscribe-btn {
background: #72BEFA !important;
color: #2F2D2E !important;
}
.codecut-subscribe-form .codecut-subscribe-btn:hover {
background: #5aa8e8 !important;
}
.codecut-subscribe-form {
max-width: 650px;
display: flex;
flex-direction: column;
gap: 8px;
}
.codecut-input {
-webkit-appearance: none;
-moz-appearance: none;
appearance: none;
background: #FFFFFF;
border-radius: 8px !important;
padding: 8px 12px;
font-family: ‘Comfortaa’, sans-serif !important;
font-size: 14px !important;
color: #333333;
border: none !important;
outline: none;
width: 100%;
box-sizing: border-box;
}
input[type=”email”].codecut-input {
border-radius: 8px !important;
}
.codecut-input::placeholder {
color: #666666;
}
.codecut-email-row {
display: flex;
align-items: stretch;
height: 36px;
gap: 8px;
}
.codecut-email-row .codecut-input {
flex: 1;
}
.codecut-subscribe-btn {
background: #72BEFA;
color: #2F2D2E;
border: none;
border-radius: 8px;
padding: 8px 14px;
font-family: ‘Comfortaa’, sans-serif;
font-size: 14px;
font-weight: 500;
cursor: pointer;
text-decoration: none;
display: flex;
align-items: center;
justify-content: center;
transition: background 0.3s ease;
}
.codecut-subscribe-btn:hover {
background: #5aa8e8;
}
.codecut-subscribe-btn:disabled {
background: #999;
cursor: not-allowed;
}
.codecut-message {
font-family: ‘Comfortaa’, sans-serif;
font-size: 12px;
padding: 8px;
border-radius: 6px;
display: none;
}
.codecut-message.success {
background: #d4edda;
color: #155724;
display: block;
}
/* Mobile responsive */
@media (max-width: 480px) {
.codecut-email-row {
flex-direction: column;
height: auto;
gap: 8px;
}
.codecut-input {
border-radius: 8px;
height: 36px;
}
.codecut-subscribe-btn {
width: 100%;
text-align: center;
border-radius: 8px;
height: 36px;
}
}
Subscribe