Table of Contents
Motivation
What is behave?
Invariance Testing
Directional Testing
Minimum Functionality Testing
Behave’s Trade-offs
Conclusion
Motivation
Imagine you create an ML model to predict customer sentiment based on reviews. Upon deploying it, you realize that the model incorrectly labels certain positive reviews as negative when they’re rephrased using negative words.
This is just one example of how an extremely accurate ML model can fail without proper testing. Thus, testing your model for accuracy and reliability is crucial before deployment.
But how do you test your ML model? One straightforward approach is to use unit-test:
from textblob import TextBlob
def test_sentiment_the_same_after_paraphrasing():
sent = "The hotel room was great! It was spacious, clean and had a nice view of the city."
sent_paraphrased = "The hotel room wasn't bad. It wasn't cramped, dirty, and had a decent view of the city."
sentiment_original = TextBlob(sent).sentiment.polarity
sentiment_paraphrased = TextBlob(sent_paraphrased).sentiment.polarity
both_positive = (sentiment_original > 0) and (sentiment_paraphrased > 0)
both_negative = (sentiment_original < 0) and (sentiment_paraphrased < 0)
assert both_positive or both_negative
This approach works but can be challenging for non-technical or business participants to understand. Wouldn’t it be nice if you could incorporate project objectives and goals into your tests, expressed in natural language?
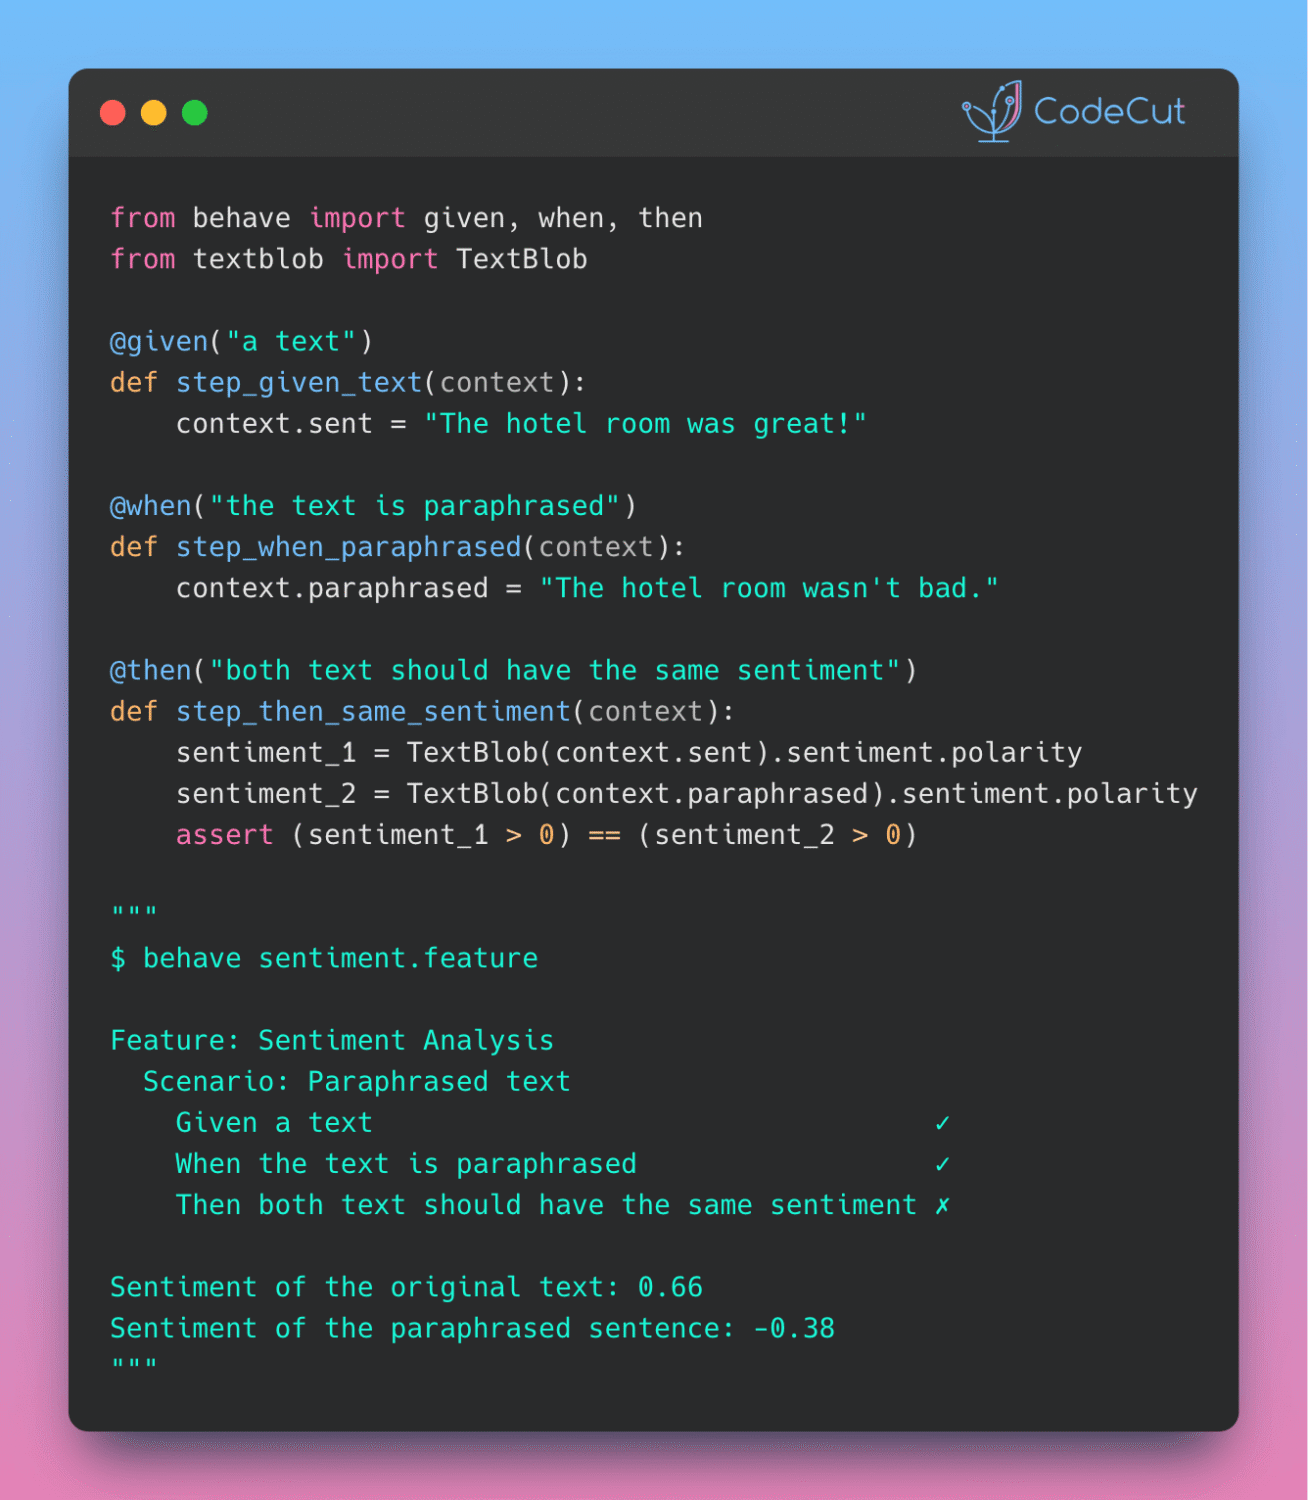
Feature: Sentiment Analysis
As a data scientist
I want to ensure that my model is invariant to paraphrasing
So that my model can produce consistent results.
Scenario: Paraphrased text
Given a text
When the text is paraphrased
Then both text should have the same sentiment
That is when behave comes in handy.
💻 Get the Code: The complete source code and Jupyter notebook for this tutorial are available on GitHub. Clone it to follow along!
Stay Current with CodeCut
Actionable Python tips, curated for busy data pros. Skim in under 2 minutes, three times a week.
.codecut-subscribe-form .codecut-input {
background: #2F2D2E !important;
border: 1px solid #72BEFA !important;
color: #FFFFFF !important;
}
.codecut-subscribe-form .codecut-input::placeholder {
color: #999999 !important;
}
.codecut-subscribe-form .codecut-subscribe-btn {
background: #72BEFA !important;
color: #2F2D2E !important;
}
.codecut-subscribe-form .codecut-subscribe-btn:hover {
background: #5aa8e8 !important;
}
.codecut-subscribe-form {
max-width: 650px;
display: flex;
flex-direction: column;
gap: 8px;
}
.codecut-input {
-webkit-appearance: none;
-moz-appearance: none;
appearance: none;
background: #FFFFFF;
border-radius: 8px !important;
padding: 8px 12px;
font-family: ‘Comfortaa’, sans-serif !important;
font-size: 14px !important;
color: #333333;
border: none !important;
outline: none;
width: 100%;
box-sizing: border-box;
}
input[type=”email”].codecut-input {
border-radius: 8px !important;
}
.codecut-input::placeholder {
color: #666666;
}
.codecut-email-row {
display: flex;
align-items: stretch;
height: 36px;
gap: 8px;
}
.codecut-email-row .codecut-input {
flex: 1;
}
.codecut-subscribe-btn {
background: #72BEFA;
color: #2F2D2E;
border: none;
border-radius: 8px;
padding: 8px 14px;
font-family: ‘Comfortaa’, sans-serif;
font-size: 14px;
font-weight: 500;
cursor: pointer;
text-decoration: none;
display: flex;
align-items: center;
justify-content: center;
transition: background 0.3s ease;
}
.codecut-subscribe-btn:hover {
background: #5aa8e8;
}
.codecut-subscribe-btn:disabled {
background: #999;
cursor: not-allowed;
}
.codecut-message {
font-family: ‘Comfortaa’, sans-serif;
font-size: 12px;
padding: 8px;
border-radius: 6px;
display: none;
}
.codecut-message.success {
background: #d4edda;
color: #155724;
display: block;
}
/* Mobile responsive */
@media (max-width: 480px) {
.codecut-email-row {
flex-direction: column;
height: auto;
gap: 8px;
}
.codecut-input {
border-radius: 8px;
height: 36px;
}
.codecut-subscribe-btn {
width: 100%;
text-align: center;
border-radius: 8px;
height: 36px;
}
}
Subscribe
What is behave?
behave is a Python framework for behavior-driven development (BDD). BDD is a software development methodology that:
Emphasizes collaboration between stakeholders (such as business analysts, developers, and testers)
Enables users to define requirements and specifications for a software application
Since behave provides a common language and format for expressing requirements and specifications, it can be ideal for defining and validating the behavior of machine learning models.
To install behave, type:
pip install behave
Let’s use behave to perform various tests on machine learning models.
📚 For comprehensive unit testing strategies and best practices, check out Production-Ready Data Science.
Invariance Testing
Invariance testing tests whether an ML model produces consistent results under different conditions.
An example of invariance testing involves verifying if a model is invariant to paraphrasing. An ideal model should maintain consistent sentiment scores even when a positive review is rephrased using negative words like “wasn’t bad” instead of “was good.”
Feature File
To use behave for invariance testing, create a directory called features. Under that directory, create a file called invariant_test_sentiment.feature.
└── features/
└─── invariant_test_sentiment.feature
Within the invariant_test_sentiment.feature file, we will specify the project requirements:
Feature: Sentiment Analysis
As a data scientist
I want to ensure that my model is invariant to paraphrasing
So that my model can produce consistent results.
Scenario: Paraphrased text
Given a text
When the text is paraphrased
Then both text should have the same sentiment
The “Given,” “When,” and “Then” parts of this file present the actual steps that will be executed by behave during the test.
The Feature section serves as living documentation to provide context but does not trigger test execution.
Python Step Implementation
To implement the steps used in the scenarios with Python, start with creating the features/steps directory and a file called invariant_test_sentiment.py within it:
└── features/
├──── invariant_test_sentiment.feature
└──── steps/
└──── invariant_test_sentiment.py
The invariant_test_sentiment.py file contains the following code, which tests whether the sentiment produced by the TextBlob model is consistent between the original text and its paraphrased version.
from behave import given, then, when
from textblob import TextBlob
@given("a text")
def step_given_positive_sentiment(context):
context.sent = "The hotel room was great! It was spacious, clean and had a nice view of the city."
@when("the text is paraphrased")
def step_when_paraphrased(context):
context.sent_paraphrased = "The hotel room wasn't bad. It wasn't cramped, dirty, and had a decent view of the city."
@then("both text should have the same sentiment")
def step_then_sentiment_analysis(context):
# Get sentiment of each sentence
sentiment_original = TextBlob(context.sent).sentiment.polarity
sentiment_paraphrased = TextBlob(context.sent_paraphrased).sentiment.polarity
# Print sentiment
print(f"Sentiment of the original text: {sentiment_original:.2f}")
print(f"Sentiment of the paraphrased sentence: {sentiment_paraphrased:.2f}")
# Assert that both sentences have the same sentiment
both_positive = (sentiment_original > 0) and (sentiment_paraphrased > 0)
both_negative = (sentiment_original < 0) and (sentiment_paraphrased < 0)
assert both_positive or both_negative
Explanation of the code above:
The steps are identified using decorators matching the feature’s predicate: given, when, and then.
The decorator accepts a string containing the rest of the phrase in the matching scenario step.
The context variable allows you to share values between steps.
Run the Test
To run the invariant_test_sentiment.feature test, type the following command:
behave features/invariant_test_sentiment.feature
Output:
Feature: Sentiment Analysis # features/invariant_test_sentiment.feature:1
As a data scientist
I want to ensure that my model is invariant to paraphrasing
So that my model can produce consistent results in real-world scenarios.
Scenario: Paraphrased text
Given a text
When the text is paraphrased
Then both text should have the same sentiment
Traceback (most recent call last):
assert both_positive or both_negative
AssertionError
Captured stdout:
Sentiment of the original text: 0.66
Sentiment of the paraphrased sentence: -0.38
Failing scenarios:
features/invariant_test_sentiment.feature:6 Paraphrased text
0 features passed, 1 failed, 0 skipped
0 scenarios passed, 1 failed, 0 skipped
2 steps passed, 1 failed, 0 skipped, 0 undefined
The output shows that the first two steps passed and the last step failed, indicating that the model is affected by paraphrasing.
Directional Testing
Directional testing is a statistical method used to assess whether the impact of an independent variable on a dependent variable is in a particular direction, either positive or negative.
An example of directional testing is to check whether the presence of a specific word has a positive or negative effect on the sentiment score of a given text.
To use behave for directional testing, we will create two files directional_test_sentiment.feature and directional_test_sentiment.py.
└── features/
├──── directional_test_sentiment.feature
└──── steps/
└──── directional_test_sentiment.py
Feature File
The code in directional_test_sentiment.feature specifies the requirements of the project as follows:
Feature: Sentiment Analysis with Specific Word
As a data scientist
I want to ensure that the presence of a specific word
has a positive or negative effect on the sentiment score of a text
Scenario: Sentiment analysis with specific word
Given a sentence
And the same sentence with the addition of the word 'awesome'
When I input the new sentence into the model
Then the sentiment score should increase
Notice that “And” is added to the prose. Since the preceding step starts with “Given,” behave will rename “And” to “Given.”
Python Step Implementation
The code in directional_test_sentiment.py implements a test scenario, which checks whether the presence of the word “awesome ” positively affects the sentiment score generated by the TextBlob model.
from behave import given, then, when
from textblob import TextBlob
@given("a sentence")
def step_given_positive_word(context):
context.sent = "I love this product"
@given("the same sentence with the addition of the word '{word}'")
def step_given_a_positive_word(context, word):
context.new_sent = f"I love this {word} product"
@when("I input the new sentence into the model")
def step_when_use_model(context):
context.sentiment_score = TextBlob(context.sent).sentiment.polarity
context.adjusted_score = TextBlob(context.new_sent).sentiment.polarity
@then("the sentiment score should increase")
def step_then_positive(context):
assert context.adjusted_score > context.sentiment_score
The second step uses the parameter syntax {word}. When the .feature file is run, the value specified for {word} in the scenario is automatically passed to the corresponding step function.
This means that if the scenario states that the same sentence should include the word “awesome,” behave will automatically replace {word} with “awesome.”
This conversion is useful when you want to use different values for the {word} parameter without changing both the .feature file and the .py file.
Run the Test
behave features/directional_test_sentiment.feature
Output:
Feature: Sentiment Analysis with Specific Word
As a data scientist
I want to ensure that the presence of a specific word has a positive or negative effect on the sentiment score of a text
Scenario: Sentiment analysis with specific word
Given a sentence
And the same sentence with the addition of the word 'awesome'
When I input the new sentence into the model
Then the sentiment score should increase
1 feature passed, 0 failed, 0 skipped
1 scenario passed, 0 failed, 0 skipped
4 steps passed, 0 failed, 0 skipped, 0 undefined
Since all the steps passed, we can infer that the sentiment score increases due to the new word’s presence.
Minimum Functionality Testing
Minimum functionality testing is a type of testing that verifies if the system or product meets the minimum requirements and is functional for its intended use.
One example of minimum functionality testing is to check whether the model can handle different types of inputs, such as numerical, categorical, or textual data. To test with diverse inputs, generate test data using Faker for more comprehensive validation.
To use minimum functionality testing for input validation, create two files minimum_func_test_input.feature and minimum_func_test_input.py.
└── features/
├──── minimum_func_test_input.feature
└──── steps/
└──── minimum_func_test_input.py
Feature File
The code in minimum_func_test_input.feature specifies the project requirements as follows:
Feature: Test my_ml_model
Scenario: Test integer input
Given I have an integer input of 42
When I run the model
Then the output should be an array of one number
Scenario: Test float input
Given I have a float input of 3.14
When I run the model
Then the output should be an array of one number
Scenario: Test list input
Given I have a list input of [1, 2, 3]
When I run the model
Then the output should be an array of three numbers
Python Step Implementation
The code in minimum_func_test_input.py implements the requirements, checking if the output generated by predict for a specific input type meets the expectations.
from behave import given, then, when
import numpy as np
from sklearn.linear_model import LinearRegression
from typing import Union
def predict(input_data: Union[int, float, str, list]):
"""Create a model to predict input data"""
# Reshape the input data
if isinstance(input_data, (int, float, list)):
input_array = np.array(input_data).reshape(-1, 1)
else:
raise ValueError("Input type not supported")
# Create a linear regression model
model = LinearRegression()
# Train the model on a sample dataset
X = np.array([[1], [2], [3], [4], [5]])
y = np.array([2, 4, 6, 8, 10])
model.fit(X, y)
# Predict the output using the input array
return model.predict(input_array)
@given("I have an integer input of {input_value}")
def step_given_integer_input(context, input_value):
context.input_value = int(input_value)
@given("I have a float input of {input_value}")
def step_given_float_input(context, input_value):
context.input_value = float(input_value)
@given("I have a list input of {input_value}")
def step_given_list_input(context, input_value):
context.input_value = eval(input_value)
@when("I run the model")
def step_when_run_model(context):
context.output = predict(context.input_value)
@then("the output should be an array of one number")
def step_then_check_output(context):
assert isinstance(context.output, np.ndarray)
assert all(isinstance(x, (int, float)) for x in context.output)
assert len(context.output) == 1
@then("the output should be an array of three numbers")
def step_then_check_output(context):
assert isinstance(context.output, np.ndarray)
assert all(isinstance(x, (int, float)) for x in context.output)
assert len(context.output) == 3
Run the Test
behave features/minimum_func_test_input.feature
Output:
Feature: Test my_ml_model
Scenario: Test integer input
Given I have an integer input of 42
When I run the model
Then the output should be an array of one number
Scenario: Test float input
Given I have a float input of 3.14
When I run the model
Then the output should be an array of one number
Scenario: Test list input
Given I have a list input of [1, 2, 3]
When I run the model
Then the output should be an array of three numbers
1 feature passed, 0 failed, 0 skipped
3 scenarios passed, 0 failed, 0 skipped
9 steps passed, 0 failed, 0 skipped, 0 undefined
Since all the steps passed, we can conclude that the model outputs match our expectations.
Behave’s Trade-offs
This section will outline some drawbacks of using behave compared to pytest, and explain why it may still be worth considering the tool.
Learning Curve
Using Behavior-Driven Development (BDD) in behavior may result in a steeper learning curve than the more traditional testing approach used by pytest.
Counter argument: The focus on collaboration in BDD can lead to better alignment between business requirements and software development, resulting in a more efficient development process overall.
Slower performance
behave tests can be slower than pytest tests because behave must parse the feature files and map them to step definitions before running the tests.
Counter argument: behave’s focus on well-defined steps can lead to tests that are easier to understand and modify, reducing the overall effort required for test maintenance.
Less flexibility
behave is more rigid in its syntax, while pytest allows more flexibility in defining tests and fixtures.
Counter argument: behave’s rigid structure can help ensure consistency and readability across tests, making them easier to understand and maintain over time.
Conclusion
You’ve learned how to use behave to write readable tests for a data science project.
Key takeaways:
How behave works:
Feature files serve as living documentation: They communicate test intent in natural language while driving actual test execution
Step decorators bridge features and code: @given, @when, and @then decorators map feature file steps to Python test implementations
Three essential test types:
Invariance testing: Ensures your model produces consistent results when inputs are paraphrased or slightly modified
Directional testing: Validates that specific changes have the expected positive or negative impact on predictions
Minimum functionality testing: Verifies your model handles different input types correctly
Despite trade-offs like a steeper learning curve and slower performance compared to pytest, behave excels where it matters most for ML testing: making model behavior transparent and testable by both technical and non-technical team members.
Related Tutorials
Configuration Management: Hydra for Python Configuration for managing test specifications with YAML-like syntax
📚 Want to go deeper? Learning new techniques is the easy part. Knowing how to structure, test, and deploy them is what separates side projects from real work. My book shows you how to build data science projects that actually make it to production. Get the book →
Stay Current with CodeCut
Actionable Python tips, curated for busy data pros. Skim in under 2 minutes, three times a week.
.codecut-subscribe-form .codecut-input {
background: #2F2D2E !important;
border: 1px solid #72BEFA !important;
color: #FFFFFF !important;
}
.codecut-subscribe-form .codecut-input::placeholder {
color: #999999 !important;
}
.codecut-subscribe-form .codecut-subscribe-btn {
background: #72BEFA !important;
color: #2F2D2E !important;
}
.codecut-subscribe-form .codecut-subscribe-btn:hover {
background: #5aa8e8 !important;
}
.codecut-subscribe-form {
max-width: 650px;
display: flex;
flex-direction: column;
gap: 8px;
}
.codecut-input {
-webkit-appearance: none;
-moz-appearance: none;
appearance: none;
background: #FFFFFF;
border-radius: 8px !important;
padding: 8px 12px;
font-family: ‘Comfortaa’, sans-serif !important;
font-size: 14px !important;
color: #333333;
border: none !important;
outline: none;
width: 100%;
box-sizing: border-box;
}
input[type=”email”].codecut-input {
border-radius: 8px !important;
}
.codecut-input::placeholder {
color: #666666;
}
.codecut-email-row {
display: flex;
align-items: stretch;
height: 36px;
gap: 8px;
}
.codecut-email-row .codecut-input {
flex: 1;
}
.codecut-subscribe-btn {
background: #72BEFA;
color: #2F2D2E;
border: none;
border-radius: 8px;
padding: 8px 14px;
font-family: ‘Comfortaa’, sans-serif;
font-size: 14px;
font-weight: 500;
cursor: pointer;
text-decoration: none;
display: flex;
align-items: center;
justify-content: center;
transition: background 0.3s ease;
}
.codecut-subscribe-btn:hover {
background: #5aa8e8;
}
.codecut-subscribe-btn:disabled {
background: #999;
cursor: not-allowed;
}
.codecut-message {
font-family: ‘Comfortaa’, sans-serif;
font-size: 12px;
padding: 8px;
border-radius: 6px;
display: none;
}
.codecut-message.success {
background: #d4edda;
color: #155724;
display: block;
}
/* Mobile responsive */
@media (max-width: 480px) {
.codecut-email-row {
flex-direction: column;
height: auto;
gap: 8px;
}
.codecut-input {
border-radius: 8px;
height: 36px;
}
.codecut-subscribe-btn {
width: 100%;
text-align: center;
border-radius: 8px;
height: 36px;
}
}
Subscribe